

Craving something sweet but don’t want to turn on the oven? This Oreo pop cake recipe is your new best friend! These little bites of heaven combine crushed Oreo cookies, creamy filling, and a chocolatey coating to create a dessert that’s not just mouthwatering but also super easy to make.
Whether you’re prepping for a birthday party, a holiday treat, or just satisfying your sweet tooth, Oreo cake pops are the perfect no-bake delight. They’re quick to assemble, fun to decorate, and irresistibly delicious.
In this article, we’ll cover everything from the essential ingredients to expert tips on getting the perfect texture and coating. You’ll also find creative variations and troubleshooting tricks to ensure your Oreo chocolate pops come out perfect every time. Let’s dive in!
Table of Contents
Introduction to Oreo Pop Cake
What Are Oreo Pop Cakes?
Oreo pop cakes, also known as Oreo cake pops, are bite-sized desserts made from crushed Oreos mixed with cream cheese, rolled into balls, and dipped in chocolate. Unlike traditional cake pops, these don’t require baking, making them a quick and hassle-free treat.
They have a soft, creamy center wrapped in a crispy chocolate shell, offering a perfect balance of textures. With just a few simple ingredients, you can whip up a batch in no time!
Why You’ll Love This Recipe
Wondering why Oreo pop cakes have taken the dessert world by storm? Here’s why you’ll absolutely love them:
- No baking required – Just crush, mix, roll, and dip!
- Minimal ingredients – All you need are Oreos, cream cheese, and chocolate.
- Perfect for any occasion – Whether it’s a party, holiday, or a simple snack craving.
- Customizable – Add sprinkles, drizzle with caramel, or use different chocolate coatings.
- Kid-friendly and fun to make – Little hands love helping shape and decorate these treats.
Now that you know why these sweet bites are so popular, let’s take a closer look at what you’ll need to make them!
Essential Ingredients for Oreo Cake Pops
Before we get into the step-by-step process, let’s go over what you’ll need to make the perfect Oreo pop cake recipe. Luckily, you only need a few simple ingredients, and you might already have them in your kitchen!
Basic Ingredients Needed
To make Oreo cake pops, you’ll need:
- Oreos – The star of the recipe! Regular Oreos work best, but you can experiment with flavored varieties.
- Cream Cheese – This binds the crushed Oreos together and creates a smooth, creamy texture.
- Chocolate Coating – White, milk, or dark chocolate for dipping. Candy melts work too!
These three ingredients form the base of the Oreo pop cake recipe, making it quick, simple, and irresistibly tasty.
Optional Add-ins for Extra Flavor
Want to get creative? Here are some fun ways to take your cake pops to the next level:
- Vanilla or almond extract – A few drops add an extra depth of flavor.
- Sprinkles or crushed nuts – Great for decorating and adding crunch.
- Food coloring – If using white chocolate, add color for festive cake pops.
- Drizzled chocolate or caramel – A beautiful finishing touch!
Now that you have everything ready, let’s move on to the fun part—making these delicious treats!
Step-by-Step Oreo Pop Cake Recipe
Making Oreo pop cakes is surprisingly easy! Just follow these steps to get perfectly smooth, delicious cake pops every time.
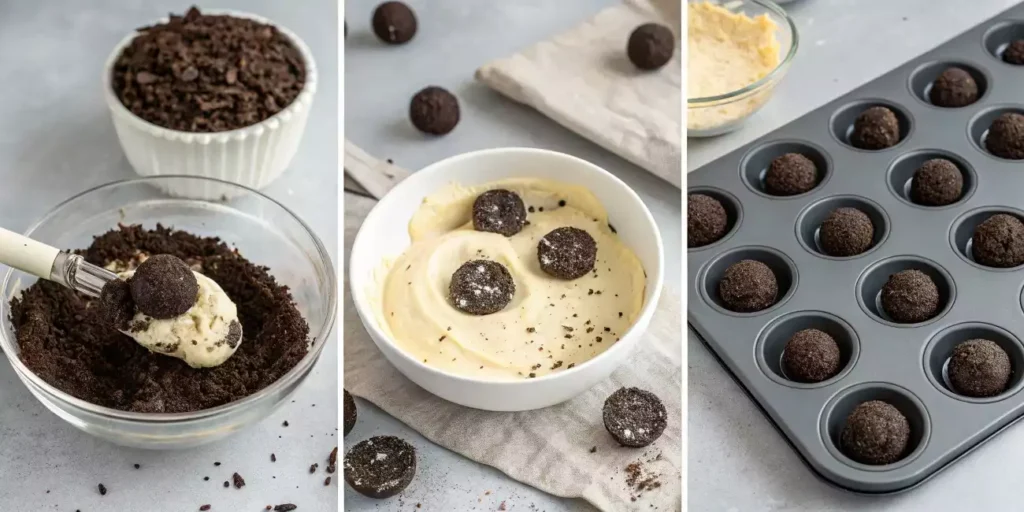
How to Prepare the Oreo Mixture
- Crush the Oreos – Use a food processor to grind them into fine crumbs. If you don’t have one, place them in a sealed bag and crush them with a rolling pin.
- Mix with Cream Cheese – Add softened cream cheese to the Oreo crumbs and mix until fully combined. The mixture should be dough-like and easy to shape.
Shaping and Chilling the Cake Pops
- Form Cake Balls – Roll the mixture into small balls, about 1 inch in diameter. If you’re using cake pop sticks, insert them now.
- Chill the Cake Pops – Place them on a tray and refrigerate for at least 30 minutes. This helps them firm up before dipping.
Once chilled, they’re ready to be dipped in melted chocolate! In the next section, we’ll cover the best techniques for coating and decorating your Oreo pop cakes to make them look as good as they taste.
Easy Oreo Pop Cake
Ingredients
Equipment
Method
- Crush the Oreos into fine crumbs using a food processor or by placing them in a sealed bag and crushing with a rolling pin.
- Mix the crushed Oreos with softened cream cheese until fully combined and dough-like.
- Roll the mixture into small balls, about 1 inch in diameter. If using cake pop sticks, insert them now.
- Chill the cake pops in the refrigerator for at least 30 minutes to firm up.
- Melt the chocolate in a microwave-safe bowl, heating in 15-second intervals and stirring between each until smooth. If needed, add a small amount of vegetable oil to thin the chocolate.
- Dip each chilled cake pop into the melted chocolate, coating it completely. Allow excess chocolate to drip off.
- Decorate with sprinkles or crushed Oreos while the chocolate is still wet.
- Place the coated cake pops on parchment paper and let the chocolate set at room temperature or in the refrigerator.
Notes
Decorating and Dipping the Cake Pops
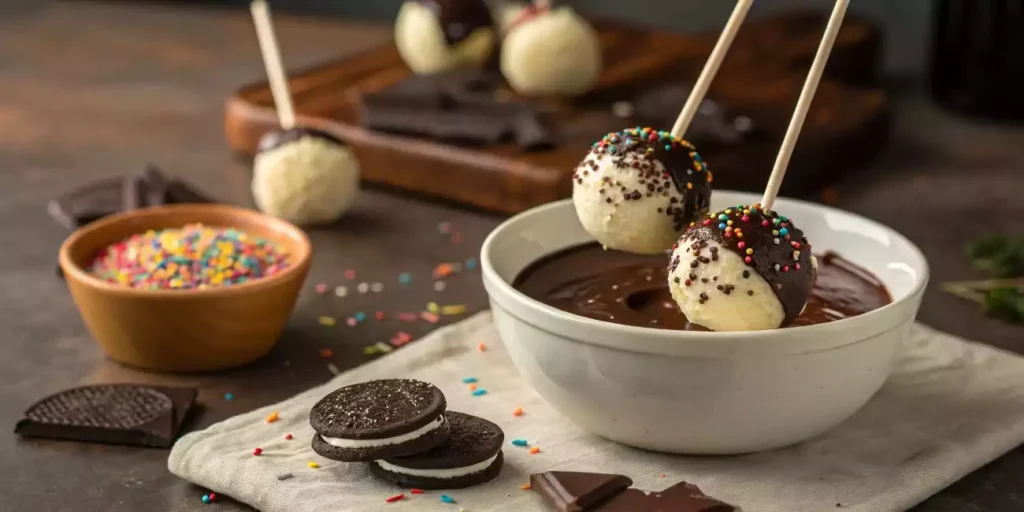
Now that your Oreo pop cake recipe is coming together, it’s time for the fun part—dipping and decorating! A smooth chocolate coating and some creative toppings can take these cake pops to the next level.
Choosing the Right Chocolate Coating
The chocolate coating is what gives Oreo cake pops their signature crunchy shell. Here’s how to get it just right:
- Use high-quality chocolate or candy melts – They melt evenly and provide a smoother finish.
- Melt chocolate properly – Use a microwave in 15-second intervals, stirring between each. Avoid overheating, as this can cause the chocolate to seize.
- Thin out the chocolate if needed – Add a little coconut oil or vegetable shortening to make dipping easier.
Once your chocolate is melted and ready, it’s time to coat your cake pops!
Decorating with Sprinkles and Drizzles
Want to make your Oreo pop cakes extra special? Here are some decoration ideas:
- Sprinkles – Add them while the chocolate is still wet for a festive touch.
- Drizzled chocolate – Use a contrasting chocolate color for an elegant finish.
- Crushed Oreos or nuts – Press them onto the coating for extra texture.
- Themed decorations – Customize for holidays or special events with colored candy melts.
After decorating, let the cake pops set on parchment paper until the coating hardens. Now they’re ready to enjoy!
For more creamy desserts, try this Madeleine Cookies Recipe Using Cream!
Expert Tips for Perfect Oreo Cake Pops
Even though Oreo cake pops are easy to make, a few pro tips can help you avoid common mistakes and get the best results.
Avoiding Common Mistakes
- Why do cake pops crack? – This happens when cold cake balls meet hot chocolate. Let them sit at room temperature for a few minutes before dipping.
- Cake pops falling off the stick? – Dip the tip of the stick in melted chocolate before inserting it into the cake ball. This helps it stay in place.
- Chocolate too thick? – If your coating is clumpy, add a little coconut oil to make it smoother.
Best Storage and Serving Tips
- Refrigeration: Store cake pops in an airtight container in the fridge for up to a week.
- Freezing: Want to make them ahead of time? Freeze uncoated cake pops and dip them when ready to serve.
- Serving: Arrange them in a decorative stand, wrap them as gifts, or enjoy them straight from the fridge!
These expert tips will ensure your Oreo pop cake recipe turns out perfectly every time!
Variations of Oreo Cake Pops
One of the best things about this Oreo pop cake recipe is how versatile it is! You can easily switch up the flavors, coatings, and decorations to make them fit any occasion or dietary preference.
Vegan and Dairy-Free Alternatives
Want to make these treats dairy-free? No problem! Just swap out a few ingredients:
- Use dairy-free cream cheese – Brands like Daiya or Kite Hill work great.
- Pick a vegan chocolate – Dark chocolate is often dairy-free, but always check the label.
- Go for gluten-free Oreos – If you need a gluten-free option, these work just as well!
These small changes make it easy to enjoy a delicious Oreo cake pop recipe while keeping it plant-based.
Fun Flavor Twists
If you love experimenting in the kitchen, try these creative variations:
- Mint Oreo Cake Pops – Use mint-flavored Oreos and add a drop of peppermint extract.
- Peanut Butter Oreo Pops – Mix in a spoonful of peanut butter for a nutty twist.
- Red Velvet Oreo Pops – Use red velvet Oreos and coat them in white chocolate.
- Cookies and Cream Cake Pops – Stir crushed Oreos into the melted chocolate for an extra crunch!
With so many ways to customize, you’ll never get bored of this easy Oreo pop cake recipe!
Frequently Asked Questions (FAQs)
Still have questions? Here are answers to some common ones!
How to make Oreo cake pops?
It’s easy! Crush Oreos, mix them with cream cheese, roll them into balls, chill, and dip in melted chocolate. That’s it!
What is the trick to making cake pops?
The secret is chilling the cake balls before dipping and using a small amount of melted chocolate to secure the stick. This keeps them from falling apart.
What are the ingredients in Oreo soft cake?
This Oreo pop cake recipe only needs three main ingredients—Oreos, cream cheese, and chocolate. You can also add extras like sprinkles or flavor extracts!
Do Oreo cake pops need to be refrigerated?
Yes! Store them in the fridge for up to a week or freeze them for longer storage. Just let them sit at room temperature for a few minutes before serving.
Conclusion: Make Your Own Perfect Oreo Pop Cake Recipe Today!
And there you have it—everything you need to create the perfect Oreo pop cake recipe! These delicious, bite-sized treats are not only easy to make but also fun to customize for any occasion. Whether you’re making them for a party, a holiday, or just a sweet snack, they’re guaranteed to be a hit.
Remember, the key to perfect Oreo cake pops is using the right texture, proper chilling, and smooth chocolate coating. Plus, with all the fun flavor variations and decorating ideas, you can truly make these your own.
Now it’s time to get creative in the kitchen! Grab a pack of Oreos, melt some chocolate, and start rolling your way to the most irresistible no-bake dessert ever. Enjoy!