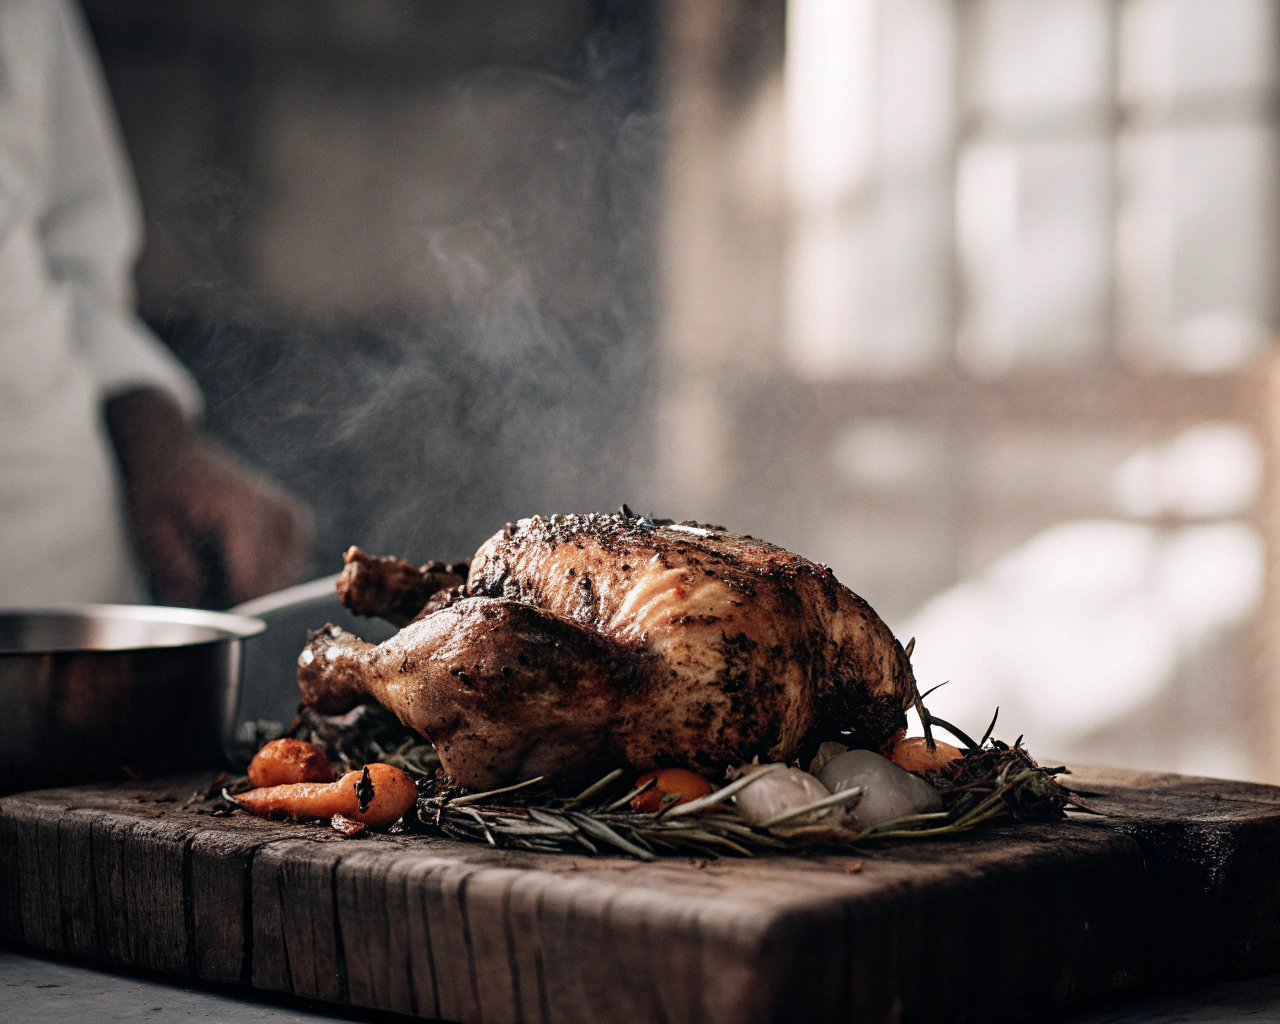

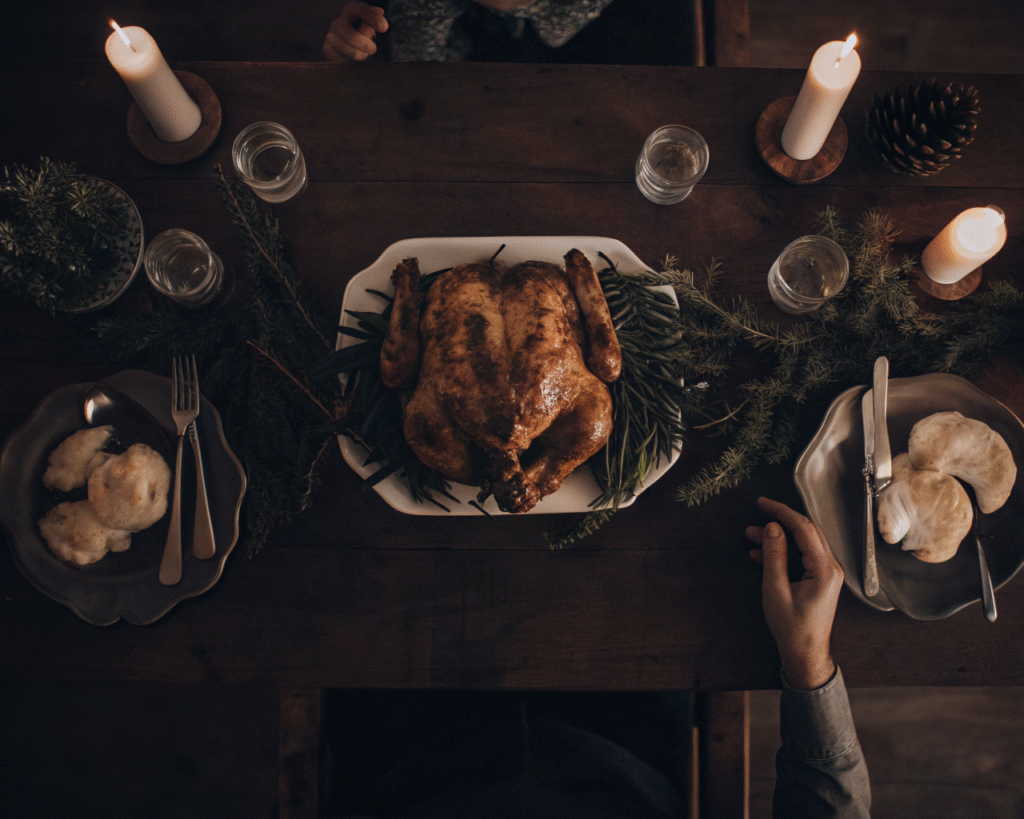
There’s something magical about a perfectly roasted chicken—golden-brown, crispy-skinned, with meat so juicy it practically falls off the bone. This Herb Butter Roast Chicken is that magical bird, and it’s about to become your signature dish for every special occasion. Whether you’re hosting Thanksgiving dinner for a smaller crowd, planning an elegant Christmas meal, celebrating Easter, or just want to make Sunday dinner feel extraordinary, this recipe delivers restaurant-quality results every single time.
What makes this roast chicken truly special is the herb butter that gets slathered all over and under the skin. As the chicken roasts, that butter bastes the meat from the inside out, infusing every bite with rich, herbaceous flavor while keeping everything incredibly moist. The skin crisps up to absolute perfection—we’re talking shatteringly crispy, golden, and utterly irresistible. And the pan drippings? They transform into the most incredible gravy you’ve ever tasted.
The best part? Despite looking and tasting like something from a fancy restaurant, this recipe is surprisingly simple. No complicated techniques, no exotic ingredients—just a whole chicken, quality butter, fresh herbs, and a handful of aromatics. If you can rub butter on chicken and turn on your oven, you can master this recipe. It’s foolproof enough for beginners but impressive enough to wow your most discerning dinner guests.
This roast chicken also solves a common holiday dilemma: what to serve when you’re not feeding a crowd of 20? A whole turkey can be overkill for smaller gatherings, but a beautifully roasted chicken feels just as festive and special without the leftovers that last for weeks. Plus, it cooks in about half the time, leaving you more time to spend with loved ones instead of hovering over the oven.
Table of Contents
Why You’ll Love This Recipe
Restaurant-Quality at Home: This chicken rivals anything you’d get at a high-end restaurant, but costs a fraction of the price and you make it in your own kitchen.
Perfect for Any Occasion: Fancy enough for Christmas dinner, easy enough for Tuesday night. It works for holidays, special celebrations, or whenever you want to feel fancy.
Incredibly Juicy: The herb butter technique ensures the meat stays moist and flavorful from the inside out—no dry chicken here!
Crispy Golden Skin: That coveted crispy skin isn’t just possible, it’s guaranteed with this method. It’s the best part and everyone will fight over it.
Makes Amazing Gravy: The pan drippings are liquid gold, creating a gravy so good you’ll want to drink it (we won’t judge).
Foolproof Method: Even if you’ve never roasted a chicken before, this recipe guides you to success. It’s nearly impossible to mess up.
Feeds 4-6 People: Perfect size for small family dinners or intimate holiday gatherings without massive leftovers.
Budget-Friendly: Whole chickens are incredibly economical, making this an affordable way to create an impressive meal.
Minimal Hands-On Time: About 15 minutes of prep, then the oven does all the work while you relax or prep sides.
Leftover Versatility: Use leftover meat for sandwiches, salads, soups, or casseroles. The carcass makes incredible homemade stock.
Ingredients You’ll Need
For the Chicken:
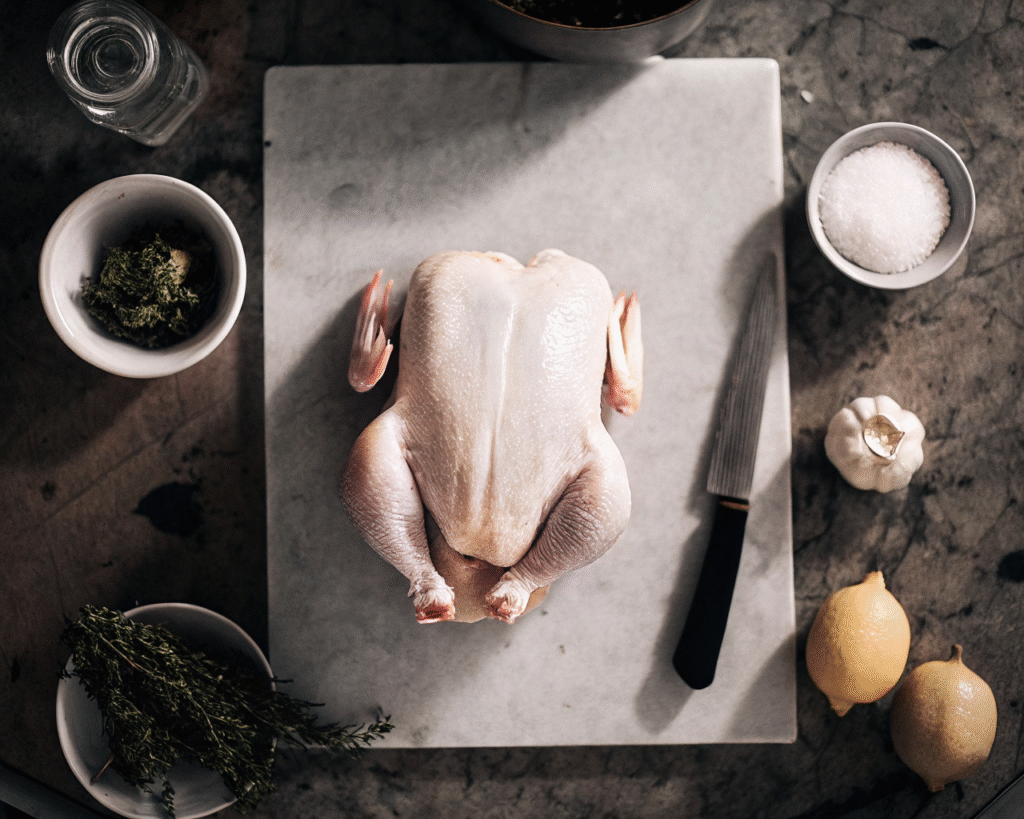
- 1 whole chicken (4-5 lbs) – Look for organic or free-range if possible for best flavor
- 6 tablespoons unsalted butter, softened – Must be soft enough to spread easily
- 3 cloves garlic, minced – Fresh is essential for best flavor
- 2 tablespoons fresh rosemary, finely chopped – Or 2 teaspoons dried
- 2 tablespoons fresh thyme leaves – Or 2 teaspoons dried
- 1 tablespoon fresh sage, chopped – Or 1 teaspoon dried
- 2 teaspoons fresh parsley, chopped – Adds color and freshness
- 1 tablespoon olive oil – For rubbing the outside
- 2 teaspoons kosher salt – Essential for seasoning and crispy skin
- 1 teaspoon black pepper, freshly ground – Adds warmth
- 1 teaspoon paprika – For color and subtle smokiness
- 1/2 teaspoon onion powder – Adds depth
- Zest of 1 lemon – Brightens all the flavors
For the Cavity (Aromatics):
- 1 lemon, halved – After zesting
- 1 medium onion, quartered – Adds sweetness
- 4-5 sprigs fresh thyme – Infuses from inside
- 3-4 sprigs fresh rosemary – More herb flavor
- 4 cloves garlic, smashed – Don’t peel, just smash
For the Roasting Pan:
- 2 cups chicken stock or broth – For gravy and keeping pan from burning
- 3 large carrots, cut into chunks – Adds flavor and serves as a roasting rack
- 3 celery stalks, cut into chunks – More aromatics
- 1 large onion, cut into wedges – Additional flavor base
Optional for Gravy:
- 2 tablespoons all-purpose flour – For thickening
- 1/4 cup white wine or additional stock – For deglazing
- Fresh herbs for garnish – Makes it pretty
Equipment You’ll Need
- Roasting pan with rack (or vegetables act as rack)
- Instant-read meat thermometer (essential!)
- Kitchen twine for trussing
- Small mixing bowl
- Paper towels
- Basting brush or spoon
- Sharp knife and cutting board
- Aluminum foil for tenting
- Fine-mesh strainer (for gravy)
- Small saucepan (for gravy)
Step-by-Step Instructions
Step 1: Prepare the Chicken (Most Important Step!)
Remove the chicken from the refrigerator 45-60 minutes before cooking to bring it to room temperature. This ensures even cooking throughout.
Remove the giblets and neck from the cavity (save for stock if desired). Pat the chicken completely dry inside and out with paper towels—this is crucial for crispy skin! Any moisture will steam the skin instead of crisping it.
Pro tip: For extra crispy skin, you can place the dried chicken uncovered in the refrigerator for 2-24 hours. The cold, dry air further dries out the skin for maximum crispiness.
Step 2: Make the Herb Butter
In a small bowl, combine the softened butter, minced garlic, chopped rosemary, thyme, sage, parsley, lemon zest, and a pinch of salt and pepper. Mix thoroughly until everything is evenly distributed. This compound butter is your secret weapon!
The secret: Room temperature butter is key—it needs to spread easily without tearing the delicate skin.
Step 3: Season and Butter the Chicken
In another small bowl, mix together the salt, pepper, paprika, and onion powder.
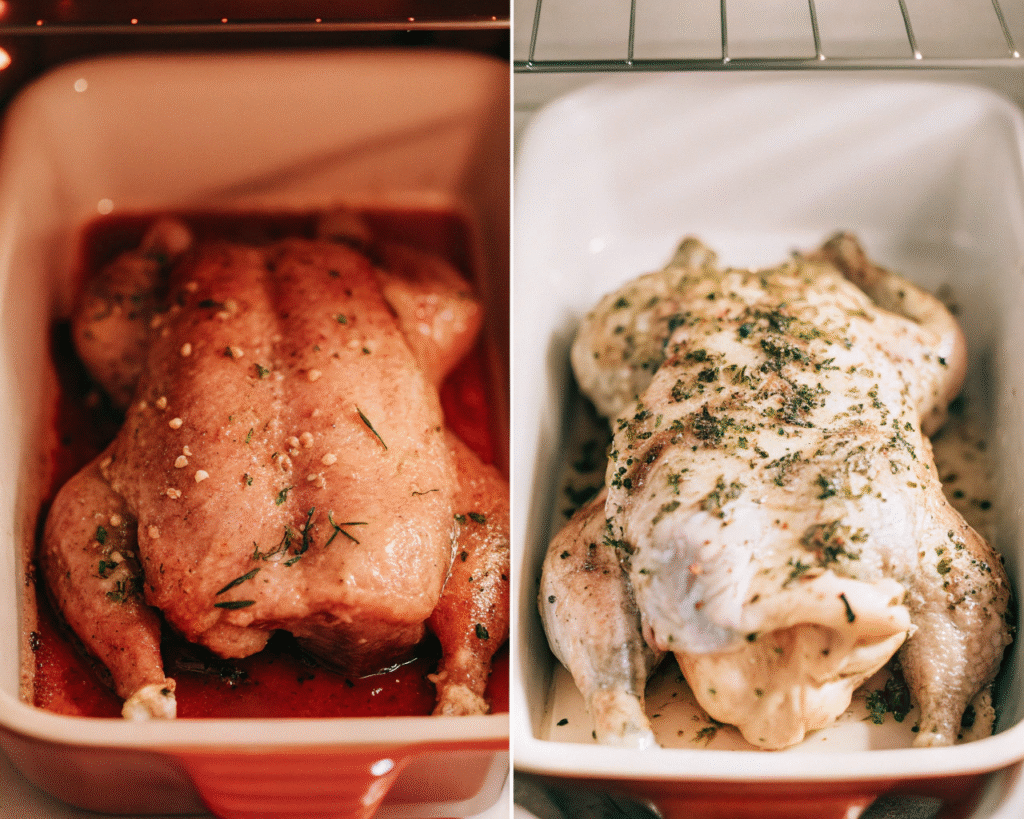
Carefully slide your fingers under the breast skin to loosen it from the meat, being careful not to tear the skin. Spread about two-thirds of the herb butter directly onto the breast meat under the skin. This is what keeps the breast meat incredibly juicy and infuses it with flavor.
Spread the remaining herb butter all over the outside of the chicken, including the legs and wings. Rub the olive oil all over the skin to help it crisp up. Sprinkle the salt and spice mixture evenly all over the outside of the chicken.
Critical: Don’t skip the butter under the skin! This is what makes the breast meat so incredibly juicy.
Step 4: Stuff the Cavity
Stuff the cavity with the lemon halves (squeeze them first to release some juice), quartered onion, herb sprigs, and smashed garlic cloves. These aromatics steam from the inside, infusing the meat with flavor.
Why it matters: The aromatics create a fragrant steam that flavors the chicken from within and keeps it moist.
Step 5: Truss the Chicken
Using kitchen twine, tie the legs together. Tuck the wing tips under the body. Trussing helps the chicken cook more evenly and maintains a beautiful shape for presentation.
Don’t have twine? No problem! The chicken will still cook perfectly, it just might not look quite as pretty.
Step 6: Prepare the Roasting Pan
Preheat your oven to 425°F (220°C).
Arrange the carrot chunks, celery pieces, and onion wedges in the bottom of your roasting pan. These vegetables serve as both a natural roasting rack and add incredible flavor to your pan drippings. Pour the chicken stock into the pan around (not over) the vegetables.
Place the chicken breast-side up on top of the vegetables, or on a roasting rack if using one.
Pro tip: The vegetables keep the chicken elevated, allowing hot air to circulate for even cooking and crispy skin all around.
Step 7: Roast at High Heat (First Stage)
Place the chicken in the preheated oven and roast at 425°F for 20 minutes. This initial high heat jump-starts the crisping process and gets that beautiful golden color going.
Step 8: Reduce Heat and Continue Roasting
After 20 minutes, reduce the oven temperature to 375°F (190°C). Continue roasting for 60-75 minutes more, depending on the size of your chicken.
The golden rule: About 15-20 minutes per pound at 375°F after the initial high-heat blast.
Baste the chicken with the pan juices every 25-30 minutes using a spoon or basting brush. This adds extra moisture and flavor while helping the skin crisp up beautifully.
Step 9: Check for Doneness (Don’t Skip This!)
The chicken is done when an instant-read thermometer inserted into the thickest part of the thigh (without touching bone) reads 165°F (74°C). The juices should run clear when pierced.
Food safety note: Always use a thermometer! This is the only reliable way to know your chicken is properly cooked. Undercooked chicken is dangerous, and overcooked chicken is dry and disappointing.
If the skin is browning too quickly before the chicken is done, tent it loosely with aluminum foil.
Step 10: Rest the Chicken (Don’t Skip!)
Transfer the chicken to a cutting board and tent loosely with foil. Let it rest for 15-20 minutes before carving. This is crucial!
Why resting matters: The resting period allows the juices to redistribute throughout the meat. If you cut into it immediately, all those flavorful juices run out onto the cutting board instead of staying in the meat. Be patient—it’s worth it!
Step 11: Make the Gravy (Optional but Highly Recommended)
While the chicken rests, strain the pan drippings through a fine-mesh strainer into a measuring cup or fat separator. Let sit for a few minutes, then skim off most of the fat (save 2-3 tablespoons if making gravy).
For gravy: In a small saucepan over medium heat, whisk together 2-3 tablespoons of the reserved fat with 2 tablespoons flour. Cook for 1-2 minutes. Slowly whisk in 2 cups of the strained pan drippings and bring to a simmer. Cook, whisking frequently, until thickened, about 5-7 minutes. Season with salt and pepper to taste.
Pro tip: If you don’t have a fat separator, place the measuring cup in the freezer for 5 minutes—the fat will rise to the top and solidify slightly, making it easy to skim off with a spoon.
Step 12: Carve and Serve
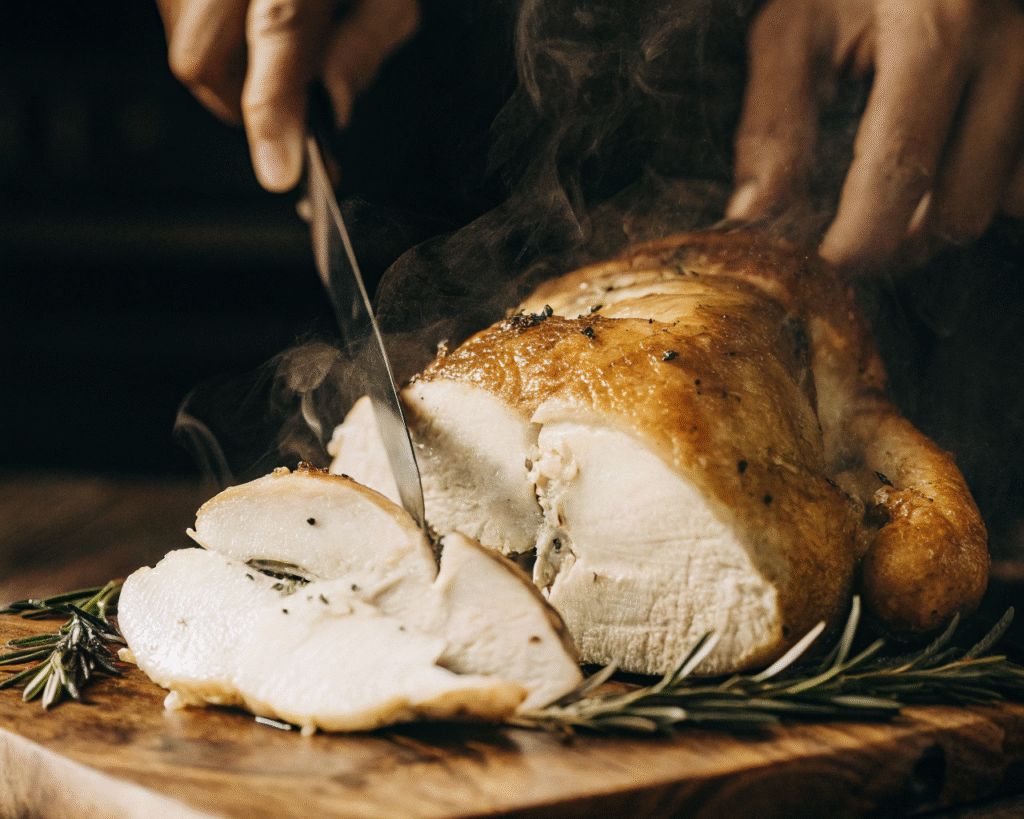
Remove the twine from the chicken. Using a sharp knife, remove the legs by cutting through the joint where the thigh meets the body. Separate the thighs from the drumsticks. Remove the breasts by slicing along one side of the breastbone, then following the rib cage to separate the meat. Slice the breast meat against the grain.
Arrange on a serving platter with the roasted vegetables from the pan. Drizzle with some of the pan juices or gravy. Garnish with fresh herbs for a beautiful presentation.
Expert Tips for Perfect Roast Chicken
Dry Skin is Crispy Skin: The number one tip for crispy skin is starting with completely dry chicken. Pat it dry thoroughly, and if you have time, let it air-dry uncovered in the fridge.
Room Temperature Matters: A cold chicken will cook unevenly—cold center, overdone outside. Always bring it to room temperature first (about 45-60 minutes on the counter).
Don’t Overcrowd the Pan: Make sure there’s space around the chicken for air circulation. Crowding creates steam, which makes soggy skin.
Butter Under the Skin: This is non-negotiable for juicy breast meat. The butter bastes the meat from the inside as it melts.
High Heat Start, Then Lower: Starting at high heat crisps the skin quickly, then lowering the temperature ensures the inside cooks through without burning the outside.
Use a Thermometer: This is the only foolproof way to know when your chicken is perfectly done. Invest in a good instant-read thermometer.
The Wiggle Test: Another doneness indicator—when the leg wiggles easily in its socket, the chicken is likely done. Still check with a thermometer though!
Let It Rest: This cannot be emphasized enough. Resting is essential for juicy meat. Don’t skip this step!
Fresh Herbs are Best: While dried herbs work, fresh herbs give so much more vibrant flavor. It’s worth it for special occasions.
Save Everything: Keep the carcass for homemade stock, and use leftover meat within 3-4 days for other meals.
Delicious Variations to Try
Lemon Herb Roast Chicken
Double the lemon—use zest in the butter and squeeze fresh lemon juice over the chicken for the last 15 minutes of roasting. Bright and fresh!
Garlic Lovers’ Chicken
Increase garlic to 6-8 cloves in the butter, and stuff the cavity with a whole head of garlic (cut in half crosswise). Roast the garlic becomes sweet and spreadable.
Herb de Provence Chicken
Swap the herbs for 3 tablespoons of Herbs de Provence for a French twist. Add lavender for authentic Provençal flavor.
Spicy Roast Chicken
Add 1 teaspoon cayenne pepper and 1 tablespoon smoked paprika to the butter mixture. Stuff cavity with jalapeños for extra kick.
Asian-Inspired Roast Chicken
Replace herbs with fresh ginger, add soy sauce and sesame oil to the butter, stuff cavity with lemongrass, ginger, and scallions.
Italian Style
Use Italian herbs (oregano, basil, marjoram), add sun-dried tomatoes to the butter, stuff with garlic and fresh basil.
Maple Mustard Glaze
Mix 1/4 cup maple syrup with 2 tablespoons Dijon mustard and brush over the chicken for the last 30 minutes of roasting.
Mediterranean Chicken
Use za’atar seasoning blend, add preserved lemon to the cavity, serve with tahini sauce.
Storage and Leftover Ideas
Refrigerator: Store leftover chicken in an airtight container for up to 4 days. Keep the meat and skin separate if possible—the skin gets soggy when stored together.
Freezer: Freeze leftover meat (without bones) in freezer bags for up to 3 months. Label with the date.
Reheating:
- Oven method (best for skin): Place pieces on a baking sheet and reheat at 375°F for 15-20 minutes until warmed through.
- Microwave (quick): Heat on 50% power in 30-second intervals to avoid drying out. The skin won’t be crispy, but it’s fast.
- Stovetop: Shred the meat and reheat in a skillet with a splash of stock.
Leftover Ideas:
- Chicken Salad: Mix shredded chicken with mayo, celery, grapes, and pecans
- Chicken Noodle Soup: Use the meat and make stock from the carcass
- Chicken Quesadillas: Shred and use in tortillas with cheese
- Chicken Caesar Wraps: Slice breast meat and wrap with romaine and Caesar dressing
- Chicken Fried Rice: Dice and stir-fry with rice and vegetables
- Buffalo Chicken Dip: Shred and mix with cream cheese and buffalo sauce
- Chicken Pot Pie: Use in a creamy filling with vegetables
- BBQ Chicken Pizza: Top pizza dough with BBQ sauce and shredded chicken
Make the Most of Every Part:
- Carcass: Make homemade chicken stock (it’s liquid gold!)
- Pan drippings: Freeze in ice cube trays for adding to sauces and soups
- Roasted vegetables: Blend into a soup or serve as a side
Serving Suggestions
This roast chicken is a complete main dish that pairs beautifully with countless sides:
Classic Holiday Sides:
- Creamy mashed potatoes
- Roasted root vegetables (carrots, parsnips, sweet potatoes)
- Green bean casserole
- Stuffing or dressing
- Cranberry sauce
- Dinner rolls
Year-Round Sides:
- Simple green salad with vinaigrette
- Roasted Brussels sprouts
- Garlic bread
- Wild rice pilaf
- Steamed broccoli with butter
- Mac and cheese (for kids!)
Lighter Options:
- Quinoa salad with herbs
- Grilled asparagus
- Cauliflower mash
- Roasted zucchini and squash
- Mixed greens with citrus dressing
For Special Occasions:
- Twice-baked potatoes
- Creamed spinach
- Yorkshire puddings
- Hasselback potatoes
- Honey-glazed carrots
Troubleshooting Common Issues
Skin isn’t crispy: The chicken wasn’t dry enough before roasting, or the oven temperature was too low. Make sure to pat completely dry and start with high heat.
Breast meat is dry: It was overcooked. Use a thermometer and remove from oven as soon as it hits 165°F. The butter under the skin also helps prevent this.
Chicken is undercooked: Your oven may run cool. Always rely on internal temperature, not time. Consider increasing oven temperature by 25°F.
Legs aren’t done but breast is: This is common. Remove the breast meat and return the legs to the oven for 10-15 more minutes.
Skin is burning: Lower your oven temperature or tent with foil. Your oven may run hot.
Pan is smoking: Add more liquid to the pan. The vegetables and stock should prevent burning, but some ovens are hotter.
Chicken sticks to the pan: The vegetables should prevent this, but make sure to use a proper roasting pan or line with parchment paper.
Uneven browning: Rotate the pan halfway through cooking for even heat distribution.
Too salty: Use unsalted butter and reduce the salt in your seasoning mix. You can always add more salt when serving.
Frequently Asked Questions
Do I need to brine the chicken?
No! The herb butter technique keeps the chicken incredibly moist without brining. However, if you want to brine, it won’t hurt.
Can I use frozen chicken?
You must completely thaw it first. Never cook a frozen whole chicken. Thaw in the refrigerator for 24 hours per 4-5 pounds.
What size chicken should I buy?
For 4-6 people, a 4-5 lb chicken is perfect. Smaller chickens (3-4 lbs) serve 3-4 people and cook faster.
Can I stuff the chicken with actual stuffing?
Not recommended! Stuffing prevents even cooking and can be a food safety issue. Make dressing separately on the side.
How do I know when it’s done without a thermometer?
Pierce the thigh—juices should run clear, not pink. The leg should wiggle easily. But please get a thermometer—they’re cheap and essential!
Can I cook this at a lower temperature?
Yes, but it will take longer and the skin won’t be as crispy. Try 350°F for about 20 minutes per pound.
Do I have to truss the chicken?
No, but it helps it cook more evenly and look prettier. It only takes a minute and is worth it.
Can I make this ahead?
You can prep the butter and season the chicken a day ahead, but it must be roasted fresh for best results.
My oven is small—will this fit?
A 4-5 lb chicken needs about 14-15 inches of space. Measure your oven before buying the chicken!
Can I use this method for a smaller chicken or Cornish hens?
Absolutely! Reduce cooking time proportionally. Cornish hens take about 45-60 minutes total.
Why This Recipe Works
The success of this roast chicken lies in several key techniques:
The High-to-Low Temperature Method: Starting at high heat crisps and browns the skin quickly, while reducing the temperature ensures the inside cooks through gently without drying out or burning the exterior.
Butter Under the Skin: This is the secret to incredibly juicy breast meat. The butter melts and bastes the meat from the inside, keeping it moist while the outside crisps up.
Dry Skin: Patting the chicken completely dry before seasoning is crucial. Moisture is the enemy of crispy skin—it creates steam, which makes the skin rubbery.
Room Temperature Start: A cold chicken has a cold center that takes longer to cook, meaning the outside overcooks by the time the inside is done. Room temperature ensures even cooking.
Aromatic Cavity Stuffing: The herbs, citrus, and aromatics in the cavity steam from the inside, infusing the meat with flavor while adding moisture.
Vegetable Roasting Rack: The vegetables elevate the chicken, allowing hot air to circulate for even cooking and crispy skin all around, while also adding flavor to the pan drippings.
The Resting Period: Resting allows the proteins to relax and juices to redistribute throughout the meat, ensuring every bite is juicy and flavorful.
Nutritional Information
Per Serving (1/6 of chicken with skin):
- Calories: 385
- Total Fat: 24g
- Saturated Fat: 9g
- Trans Fat: 0g
- Cholesterol: 145mg
- Sodium: 520mg
- Total Carbohydrates: 2g
- Dietary Fiber: 0g
- Sugars: 0g
- Protein: 38g
Vitamins & Minerals:
- Vitamin A: 8% DV
- Vitamin C: 4% DV
- Calcium: 2% DV
- Iron: 10% DV
- Potassium: 12% DV
Notes:
- Nutritional values are approximate and will vary based on exact chicken size and whether you eat the skin
- Without skin: approximately 285 calories and 12g fat per serving
- Dark meat has slightly more calories than white meat
- This is a good source of lean protein, B vitamins, and minerals
The Final Carve
This Herb Butter Roast Chicken is more than just a recipe—it’s a technique that will serve you for life. Once you master this method, you’ll find yourself turning to it again and again for everything from intimate Sunday dinners to impressive holiday feasts. The combination of crispy golden skin, incredibly juicy meat infused with herbs and garlic, and those glorious pan drippings creates a meal that’s truly special without being complicated.
What makes this recipe truly valuable is its versatility. It’s fancy enough to anchor your Christmas dinner, simple enough for a weeknight when you want something special, and economical enough to make regularly without breaking the bank. It feeds a family perfectly without the commitment of a whole turkey, and the leftovers are endlessly useful for meals throughout the week.
The real magic is in the details—the butter under the skin, the aromatics in the cavity, the two-stage roasting, the all-important resting period. These aren’t just fancy chef tricks; they’re the difference between good roast chicken and truly exceptional roast chicken that has everyone at the table fighting over the crispy skin and asking when you’re making it again.
So whether you’re planning your holiday menu, looking for a new Sunday dinner tradition, or just want to master one really impressive dish that you can make with confidence, this is it. Once you pull that golden, fragrant chicken out of the oven and hear the collective “wow” from your family or guests, you’ll understand why roast chicken has been bringing people together around the table for generations.
Happy roasting, and enjoy every crispy, juicy, herb-infused bite! 🍗✨🎄
Yields: 4-6 servings
Prep Time: 15 minutes
Cook Time: 80-95 minutes
Resting Time: 15-20 minutes
Total Time: 2 hours
Difficulty: Easy to Intermediate