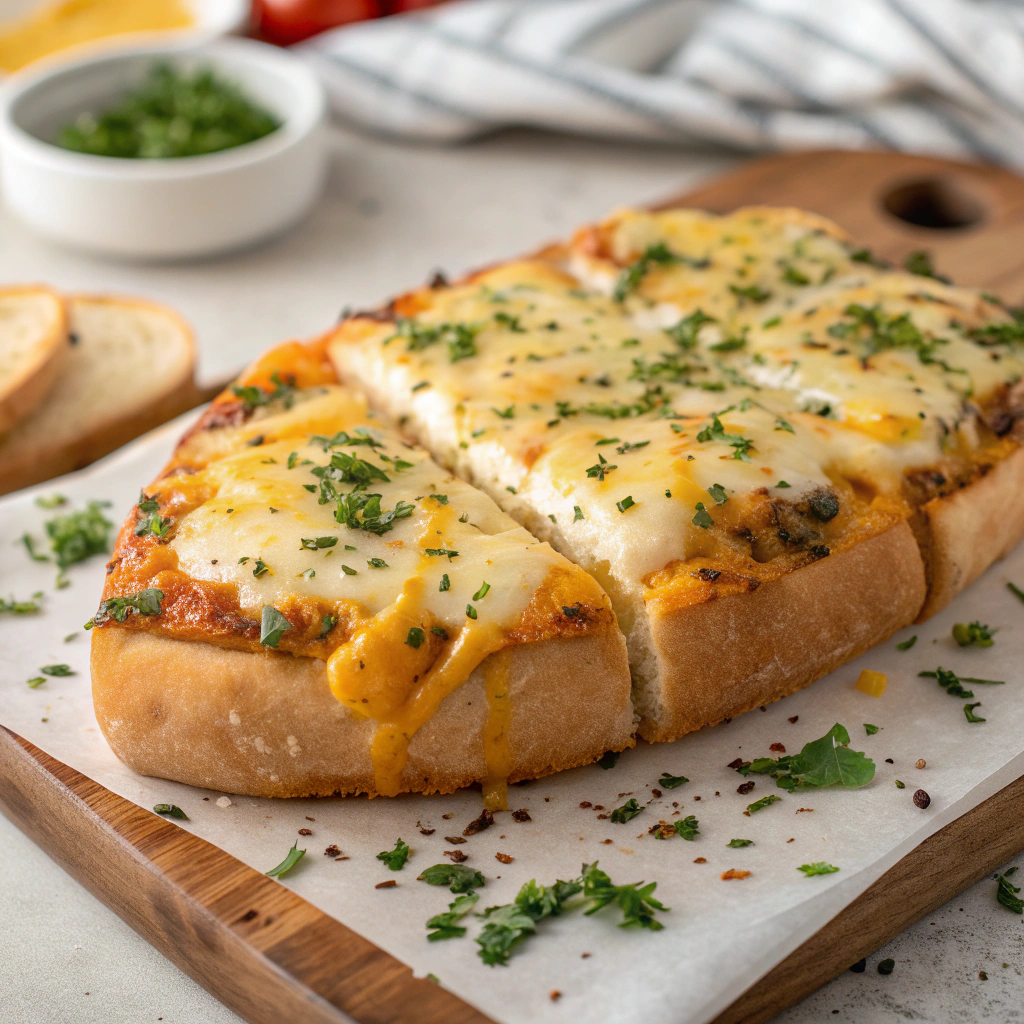
Is there anything more irresistible than warm, golden bread oozing with melted cheese that pulls apart into perfect, shareable pieces? This Cheesy Pull-Apart Bread is pure magic—crispy on the outside, soft and pillowy on the inside, and loaded with so much melted cheese that every pull creates those Instagram-worthy cheese strings we all love. It’s the kind of appetizer that disappears in minutes and has everyone reaching for “just one more piece.”
Whether you call it pull-apart bread, blooming bread, or cheese bread, this recipe is guaranteed to be the star of any gathering. It’s perfect for game day, parties, potlucks, or even a cozy night in. The best part? It looks incredibly impressive but is actually surprisingly easy to make. You don’t need any special baking skills—just a loaf of bread, lots of cheese, butter, and a few seasonings, and you’re on your way to creating something absolutely spectacular.
The magic happens when you slice the bread in a crosshatch pattern without cutting all the way through, stuff it with cheese and butter, then bake until everything is golden, crispy, and melted to perfection. Each piece pulls away easily, bringing stretchy cheese along with it. Trust me, this is the kind of dish that will have your guests hovering around the table, unable to resist going back for more!
Table of Contents
Why You’ll Love This Recipe
Insanely Cheesy: We’re talking multiple types of cheese stuffed into every crevice, creating maximum meltiness and flavor.
Easy to Make: No complicated techniques or special equipment needed. If you can slice bread and melt butter, you can make this!
Perfect for Sharing: The pull-apart nature makes it ideal for parties—no plates or utensils required, everyone just pulls off pieces.
Customizable: Add your favorite herbs, spices, bacon, jalapeños, or any mix-ins you love. This recipe is incredibly versatile.
Always a Crowd-Pleaser: I’ve never met anyone who doesn’t love this bread. It’s universally adored by kids and adults alike.
Make-Ahead Friendly: You can prep it hours ahead and bake right before serving, making entertaining stress-free.
Budget-Friendly: Uses simple, inexpensive ingredients to create something that tastes gourmet.
Impressive Presentation: Looks like you spent hours making it, but it comes together in about 15 minutes of prep time.
Ingredients You’ll Need
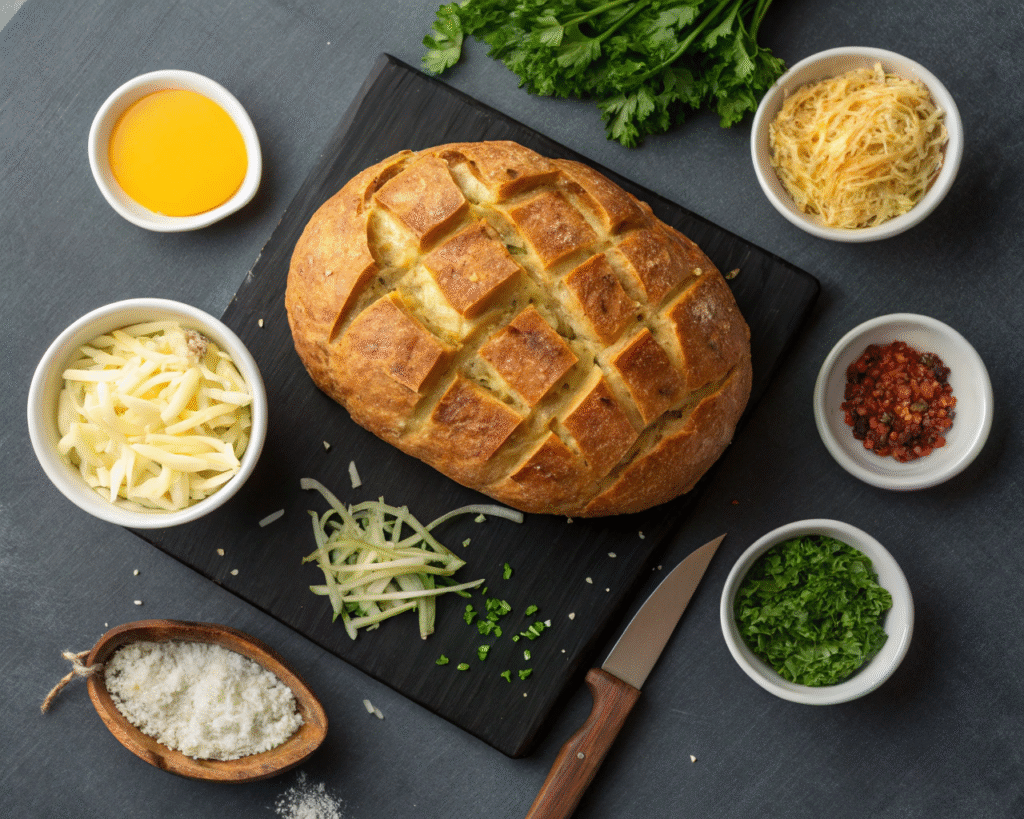
For the Bread:
- 1 large round sourdough loaf (about 1-1.5 lbs) – Or use Italian bread, boule, or artisan round loaf
- 12 oz mozzarella cheese, shredded – The ultimate melting cheese for those cheese pulls
- 8 oz sharp cheddar cheese, shredded – Adds bold, tangy flavor
- 4 oz Monterey Jack cheese, shredded – Extra creaminess and melt factor
- 1/2 cup grated Parmesan cheese – For that nutty, savory depth
For the Garlic Butter:
- 1/2 cup (1 stick) unsalted butter, melted – The flavorful vehicle for all our seasonings
- 4 cloves garlic, minced – Fresh is essential for the best flavor
- 2 tablespoons fresh parsley, finely chopped – Adds color and freshness
- 1 tablespoon fresh chives, chopped – Optional but adds nice onion flavor
- 1/2 teaspoon dried oregano – Classic Italian herb
- 1/2 teaspoon dried basil – Complements the cheese beautifully
- 1/4 teaspoon red pepper flakes – Optional, for a little kick
- 1/4 teaspoon salt – Enhances all the flavors
- 1/4 teaspoon black pepper – A little heat and depth
Optional Add-Ins:
- 6 slices cooked bacon, crumbled – For bacon lovers
- 1/4 cup sliced green onions – Adds freshness
- 1-2 jalapeños, diced – For spicy kick
- 1/2 cup cooked and crumbled sausage – Makes it heartier
- Sun-dried tomatoes, chopped – Mediterranean twist
- Fresh rosemary, chopped – Aromatic and delicious
For Serving:
- Marinara sauce – Perfect for dipping
- Ranch dressing – Classic pairing
- Garlic aioli – Extra garlicky goodness
Equipment You’ll Need
- Large serrated bread knife
- Cutting board
- Small mixing bowl
- Pastry brush or spoon
- Aluminum foil
- Baking sheet
- Small saucepan (for melting butter)
Step-by-Step Instructions
Step 1: Prep Your Workspace
Preheat your oven to 350°F (175°C). Line a large baking sheet with aluminum foil for easy cleanup. Place a piece of parchment paper on top if desired.
Pro tip: The foil will catch any cheese or butter that drips, making cleanup a breeze!
Step 2: Prepare the Garlic Butter
In a small saucepan over low heat, melt the butter. Add the minced garlic and cook for about 1-2 minutes until fragrant but not browned. Remove from heat and stir in the parsley, chives, oregano, basil, red pepper flakes (if using), salt, and pepper. Set aside.
Important: Don’t let the garlic burn or it will become bitter. Low heat and watching carefully is key.
Step 3: Mix the Cheeses
In a large bowl, combine the shredded mozzarella, cheddar, Monterey Jack, and Parmesan. Toss together until well mixed. If you’re adding bacon, sausage, or other mix-ins, fold them into the cheese mixture now.
The secret: Using multiple cheeses creates the best flavor and texture. Mozzarella melts beautifully, cheddar adds sharpness, Monterey Jack brings creaminess, and Parmesan adds depth.
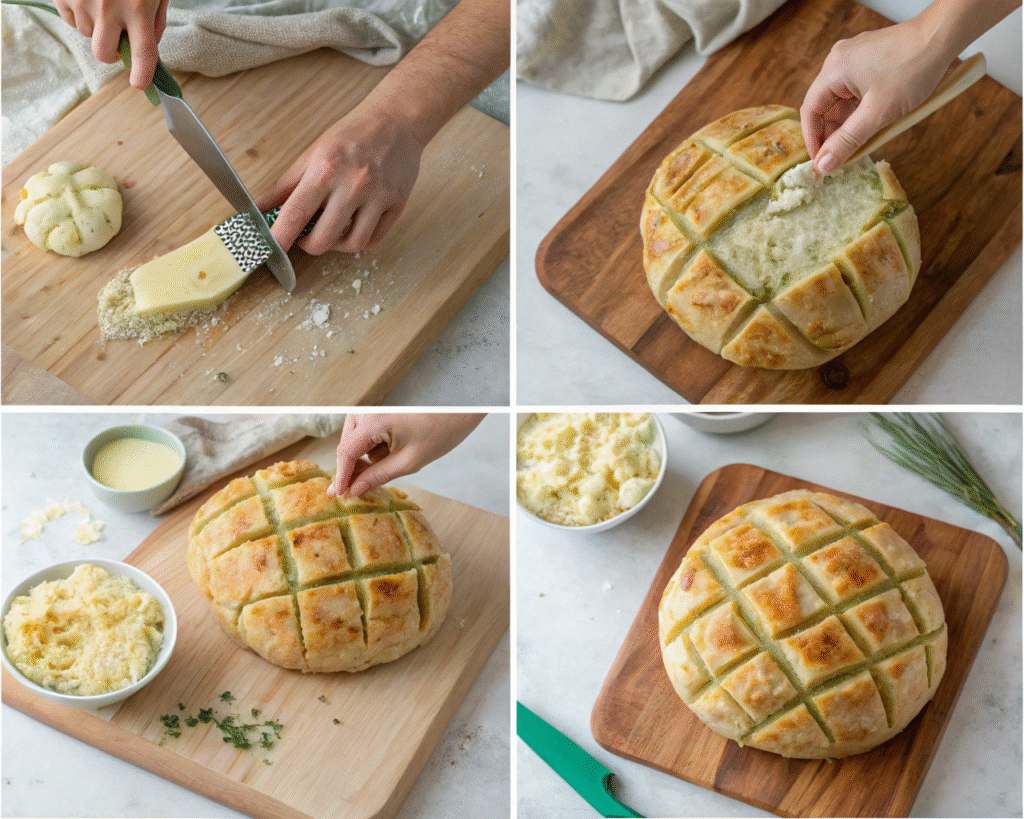
Step 4: Score the Bread (The Critical Step!)
Place your bread loaf on the cutting board. Using a large serrated knife, make diagonal cuts across the loaf about 1 inch apart, cutting down to about 1/2 inch from the bottom. Do NOT cut all the way through—the bottom needs to stay intact to hold everything together.
Rotate the bread 90 degrees and make another series of diagonal cuts perpendicular to the first cuts, again stopping about 1/2 inch from the bottom. You should now have a crosshatch pattern of diamond-shaped sections.
Critical tip: Go slowly and carefully. If you accidentally cut through, don’t worry—you can still stuff and bake it, just be gentle when handling.
Step 5: Stuff with Butter
Using a pastry brush or spoon, generously drizzle about half of the garlic butter mixture into all the cuts, making sure to get deep into the crevices. Use your fingers to gently pull the cuts apart slightly to get the butter deep inside.
Pro technique: Be generous with the butter! It not only adds flavor but helps the bread get crispy and golden.
Step 6: Stuff with Cheese
Now for the fun part! Take handfuls of the cheese mixture and stuff it generously into all the cuts, pushing it down deep between the bread pieces. Really pack it in there—the more cheese, the better! Use all the cheese mixture.
Don’t hold back: This bread is all about excess cheese. Stuff as much as you possibly can into every opening.
Step 7: Add the Final Butter Layer
Drizzle the remaining garlic butter over the entire top of the bread, letting it seep into any gaps you might have missed. Make sure the top is well coated—this will help it get beautifully golden and crispy.
Step 8: Wrap and Bake (First Stage)
Place the stuffed bread on your prepared baking sheet. Wrap the entire loaf loosely in aluminum foil, leaving the top slightly open so steam can escape.
Bake for 15 minutes with the foil on. This allows the cheese to melt and the butter to soak into the bread without the top browning too quickly.
Step 9: Unwrap and Finish Baking
After 15 minutes, carefully remove the foil (watch out for steam!). Return the bread to the oven and bake for an additional 10-15 minutes uncovered, until the top is golden brown and crispy and the cheese is bubbling throughout.
Watch closely: Every oven is different. You want the top golden and crispy but not burned.
Step 10: Serve Immediately
Remove from the oven and let it cool for just 2-3 minutes (but no longer—you want that cheese hot and melty!). Transfer to a serving platter or board.
Serve immediately while it’s hot and the cheese is at peak meltiness. Provide small plates and napkins, or just let everyone dive in and pull off pieces!
Serving tip: Place a small bowl of marinara or ranch in the center of your serving board for dipping.
Expert Tips for Perfect Pull-Apart Bread
Choose the Right Bread: A round sourdough boule is ideal because the crust is sturdy enough to hold all the cheese, and the tangy flavor complements the richness. Italian bread or any artisan round loaf works great too.
Don’t Use Pre-Shredded Cheese: Freshly shredded cheese melts much better than pre-shredded, which contains anti-caking agents that prevent smooth melting.
Room Temperature Cheese: Let your cheese sit at room temperature for about 30 minutes before using. It melts more evenly this way.
Be Generous with Cuts: Make your cuts close together (about 1 inch) to create more surface area for cheese and butter. More cuts = more cheese = more deliciousness.
Fresh Garlic is Essential: Don’t use garlic powder for the butter. Fresh minced garlic provides so much more flavor.
Customize the Herbs: Use whatever herbs you love or have on hand. Rosemary, thyme, and dill all work beautifully.
The Two-Stage Baking: Baking covered first, then uncovered, ensures the cheese melts completely while the top gets crispy and golden.
Serve Immediately: This bread is best enjoyed fresh from the oven when the cheese is hot and stretchy. It’s still good reheated, but nothing beats that fresh-baked magic.
Delicious Variations to Try
Pizza Pull-Apart Bread
Use mozzarella and Parmesan, add mini pepperoni slices between the cuts, and serve with marinara for dipping. It’s like deconstructed pizza!
Bacon Jalapeño Cheddar
Use mostly cheddar cheese, add cooked crumbled bacon and diced jalapeños for a spicy, savory version that’s absolutely addictive.
Italian Herb & Cheese
Add sun-dried tomatoes, fresh basil, and use a combination of mozzarella, provolone, and Parmesan. Very Italian restaurant-style.
Buffalo Chicken Pull-Apart
Mix shredded cooked chicken with buffalo sauce, use a blend of cheddar and mozzarella, and serve with ranch or blue cheese dressing.
Spinach Artichoke
Channel everyone’s favorite dip! Add chopped spinach and artichoke hearts to a mixture of mozzarella, Parmesan, and cream cheese.
BBQ Pulled Pork
Stuff with cheddar cheese and BBQ pulled pork for a hearty, meal-worthy version.
French Onion
Caramelize onions and stuff them in with Gruyère and Swiss cheese. Serve with beef broth for dipping.
Breakfast Version
Use cheddar and Swiss, add cooked crumbled sausage, scrambled eggs, and top with everything bagel seasoning.
Mediterranean Style
Use feta and mozzarella, add Kalamata olives, sun-dried tomatoes, and fresh oregano.
Taco Bread
Use a Mexican cheese blend, add taco-seasoned ground beef, jalapeños, and serve with salsa and sour cream.
Storage and Make-Ahead Instructions
Room Temperature: Best eaten immediately, but can sit at room temperature for up to 2 hours. After that, the cheese starts to solidify and lose its magical stretchiness.
Refrigerator: Store leftovers wrapped in foil in the refrigerator for up to 3 days. The texture won’t be quite as amazing as fresh, but it’s still delicious.
Freezer: You can freeze the unbaked, stuffed bread! Wrap tightly in plastic wrap, then foil. Freeze for up to 1 month. Bake from frozen, adding 5-10 extra minutes to the covered baking time.
Reheating:
- Oven method (best): Wrap in foil and reheat at 350°F for 10-15 minutes until warmed through and cheese is melty again.
- Microwave (quick but not as crispy): Heat individual pieces for 20-30 seconds. The bread will be softer, not crispy.
- Air fryer: 350°F for 3-5 minutes for crispy exterior.
Make-Ahead Strategy:
- 4-6 hours ahead: Prepare the bread completely through step 7 (stuffed with butter and cheese). Wrap tightly in foil and refrigerate. Bring to room temperature for 30 minutes before baking.
- 1 hour ahead: Bake completely, then keep warm in a 200°F oven until serving time.
- 30 minutes ahead: Prepare the garlic butter and cheese mixture. Store separately, then stuff and bake when ready.
Serving Suggestions
This cheesy bread is incredibly versatile:
- Game Day Appetizer: Perfect for football parties, watch parties, or any sports gathering
- Dinner Side: Serve alongside pasta, soup, or salad as a decadent side dish
- Party Centerpiece: Make it the star of your appetizer spread
- Movie Night Snack: Because movie night deserves something special
- Potluck Winner: Always the first thing to disappear at gatherings
- Holiday Appetizer: Great for Thanksgiving, Christmas, or New Year’s Eve
- Casual Dinner Party: Serve while guests mingle before the meal
What to Serve With:
- Tomato soup or minestrone
- Caesar salad or mixed greens
- Pasta with marinara
- Grilled meats or barbecue
- Beer, wine, or cocktails
- Fresh vegetable crudités for balance
Dipping Sauce Ideas:
- Warm marinara or pizza sauce
- Ranch dressing (classic!)
- Garlic aioli
- Pesto
- Beer cheese dip
- Hot honey (sweet and spicy!)
- Balsamic reduction
Troubleshooting Common Issues
Cheese isn’t melting enough: Make sure you’re baking long enough with the foil on. The covered stage is crucial for melting. Also, use freshly shredded cheese, not pre-shredded.
Top is burning before cheese melts: Lower your oven temperature to 325°F and extend the covered baking time. Cover the top with foil if it’s browning too quickly.
Bread is too crispy/hard: You may have over-baked it. Start checking at the lower end of the time range, and make sure to brush generously with butter.
Accidentally cut all the way through: No worries! Just be extra gentle when stuffing, and the melted cheese will help hold it together. You can also use toothpicks to secure any completely separated pieces.
Cheese is leaking out everywhere: This is actually normal and creates delicious crispy cheese bits! Place the bread on parchment paper or foil for easy cleanup, and those crispy cheese pieces are a bonus treat.
Bread is soggy in the middle: You used too much butter, or your cuts weren’t deep enough to allow heat penetration. Next time, make sure your cuts are evenly spaced and go deep (but not all the way through).
Not enough cheese flavor: Use more flavorful cheeses like sharp cheddar, aged Gruyère, or add more Parmesan. Also, make sure you’re seasoning your butter mixture well.
Garlic butter tastes bitter: You burned the garlic when melting the butter. Always use low heat and cook just until fragrant, not browned.
Frequently Asked Questions
Can I use a different type of bread?
Absolutely! While round sourdough is ideal, you can use Italian bread, French bread, ciabatta, or any sturdy bakery loaf. Just avoid soft sandwich bread—it won’t hold up.
Do I have to use all those cheeses?
No! You can use any combination you like. Even just mozzarella and cheddar works great. The variety just adds more complexity.
Can I make this gluten-free?
Yes! Use a good quality gluten-free artisan loaf. The technique is exactly the same.
How do I prevent cutting all the way through?
Place wooden spoons or chopsticks on either side of the bread as a guide. When your knife hits the spoons, you know to stop cutting.
Can I add meat?
Definitely! Cooked bacon, sausage, pepperoni, ham, or even pulled pork all work wonderfully.
Is this vegetarian?
Yes, as written it’s vegetarian. Just make sure your Parmesan is vegetarian-friendly (some contain animal rennet).
How many people does this serve?
As an appetizer, one loaf serves 6-8 people. As a side dish with a meal, it could stretch to 8-10.
Can I make this in advance?
Yes! Prep it completely and refrigerate up to 6 hours before baking. Just add 5 minutes to the covered baking time if baking from cold.
My cheese isn’t stretchy, why?
Pre-shredded cheese often doesn’t melt as well. Use freshly shredded mozzarella for the best cheese pulls. Also, serve immediately while hot!
Can I use dried herbs instead of fresh?
Yes, but use about 1/3 the amount since dried herbs are more concentrated.
Why This Recipe Works
The magic of pull-apart bread lies in the perfect combination of technique and ingredients:
The Crosshatch Cut: Creating a diamond pattern without cutting through the bottom means each piece is connected but easy to pull apart, and creates maximum surface area for cheese and butter.
Multiple Cheeses: Each cheese brings something different—mozzarella for stretchiness, cheddar for sharp flavor, Monterey Jack for creaminess, and Parmesan for depth.
The Two-Stage Bake: Baking covered first allows the cheese to melt and the butter to soak in without the top burning. Uncovering finishes it with a golden, crispy exterior.
Fresh Ingredients: Fresh garlic and herbs in real melted butter create so much more flavor than using dried seasonings or garlic powder.
The Right Bread: A sturdy, crusty artisan loaf provides structure to hold all that cheese while still having a soft, chewy interior that soaks up the butter.
The Final Pull
This Cheesy Pull-Apart Bread is everything an appetizer should be: fun, interactive, delicious, and absolutely impossible to stop eating. The combination of crispy, buttery exterior, soft bread interior, and insane amounts of melted, stretchy cheese creates the kind of dish that brings people together around the table, all reaching for just one more piece.
Whether you’re hosting a party, bringing something to a potluck, or just want to treat your family to something special, this recipe delivers every single time. It looks impressive, tastes incredible, and is surprisingly simple to make. The best part? Watching everyone’s faces light up when they pull off that first piece and see those glorious cheese strings stretch out.
So grab a loaf of bread, gather your favorite cheeses, and get ready to create something that will have everyone talking. Fair warning though—you might become known as “the person who makes that amazing cheese bread,” and you’ll be asked to bring it to every gathering from now on. But honestly? That’s a reputation worth having.
Happy baking, and enjoy every cheesy, buttery, pull-apart bite! 🧀🍞✨
Yields: 6-8 servings (as appetizer)
Prep Time: 15 minutes
Bake Time: 25-30 minutes
Total Time: 45 minutes
Difficulty: Easy
Voilà ! Un article complet pour le Cheesy Pull-Apart Bread avec tous les détails, astuces et variations pour réussir ce pain au fromage irrésistible ! 🧀😋