By Chef Hanna | Prep: 15 min | Cook: 12 min | Total: 27 min | Yield: 12 donuts
Table of Contents
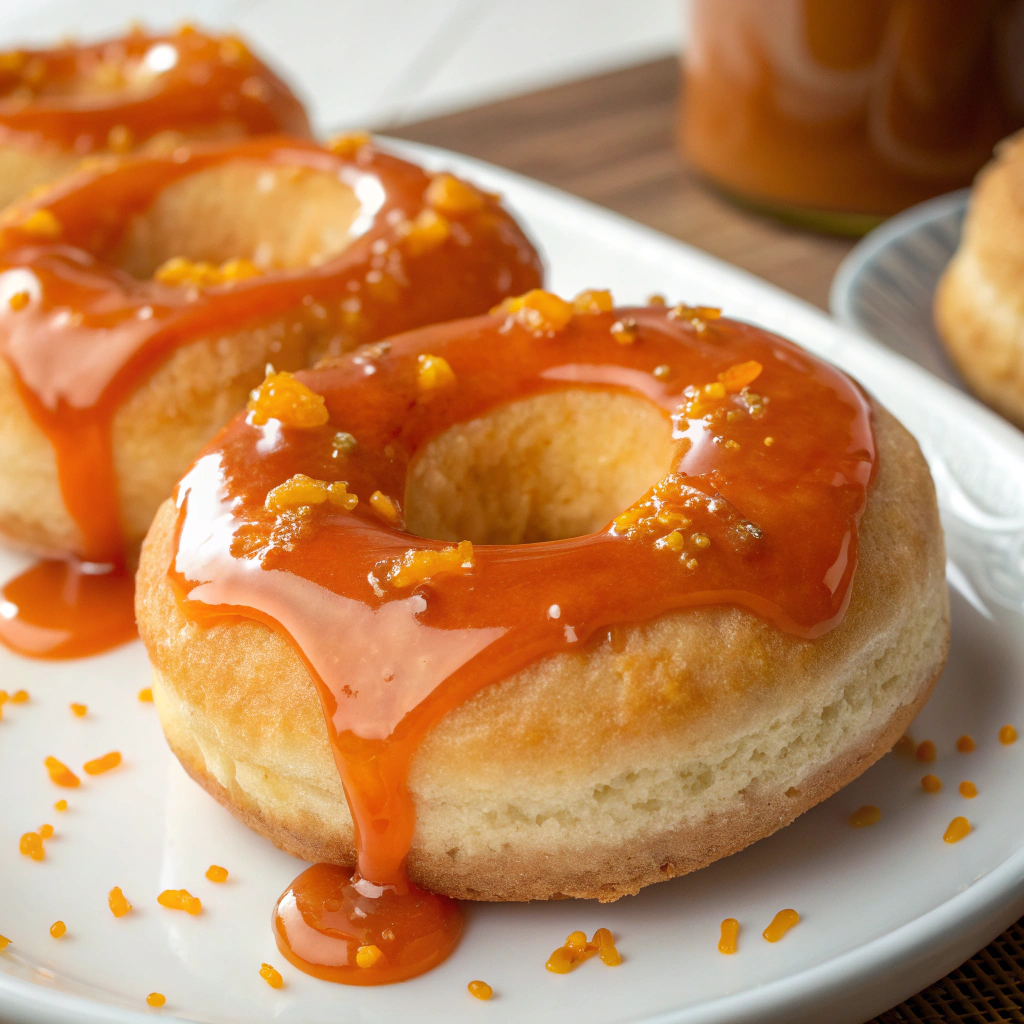
The Best Baked Donuts with Bright Orange Glaze
Craving donuts but don’t want the hassle of deep frying? I’m Chef Hanna, and these baked orange glazed donuts are about to become your new obsession! Light, fluffy, cake-style donuts baked to golden perfection, then dipped in a glossy orange glaze that’s sweet, tangy, and absolutely irresistible.
These aren’t just healthier than fried donuts – they’re actually easier to make! No hot oil to manage, no mess to clean up, and no waiting for dough to rise. These baked donuts come together quickly with simple ingredients, bake in just 12 minutes, and get topped with a vibrant orange glaze that’s made with fresh orange juice and zest for maximum citrus flavor.
What makes these orange glazed donuts so special? The combination of tender, cake-like texture with bright, sunny orange flavor creates something truly special. The glaze sets beautifully with a slight shine, and those little bits of candied orange zest on top add both visual appeal and extra citrus punch. Plus, baking instead of frying means you can feel good about having one (or two!) for breakfast.
Whether you’re looking for a fun weekend baking project, need a special breakfast treat, want to impress brunch guests, or just love the combination of donuts and citrus, this recipe delivers. Let’s make the most beautiful, delicious baked orange donuts!
Why This Baked Orange Donut Recipe Works
Baked, Not Fried: No dealing with hot oil! These bake in a donut pan for easy, healthier donuts with less mess and cleanup.
Cake-Style Texture: The batter creates tender, fluffy cake donuts – not dense or dry like some baked donuts. Perfect crumb every time!
Fresh Orange Flavor: Real orange juice and zest (not artificial extract) create bright, authentic citrus flavor that tastes like sunshine.
Quick & Easy: From mixing bowl to glazed donuts in under 30 minutes. No yeast, no rising time, no complicated steps!
Beautiful Glaze: The orange glaze sets with a gorgeous glossy finish and drips down the sides perfectly – Instagram-worthy every time.
Customizable: The base recipe is a template. Change the glaze flavor, add mix-ins, or try different toppings for endless variations.
Room for Error: This recipe is very forgiving. Even small mistakes result in delicious donuts – perfect for beginner bakers!
Ingredients You Need
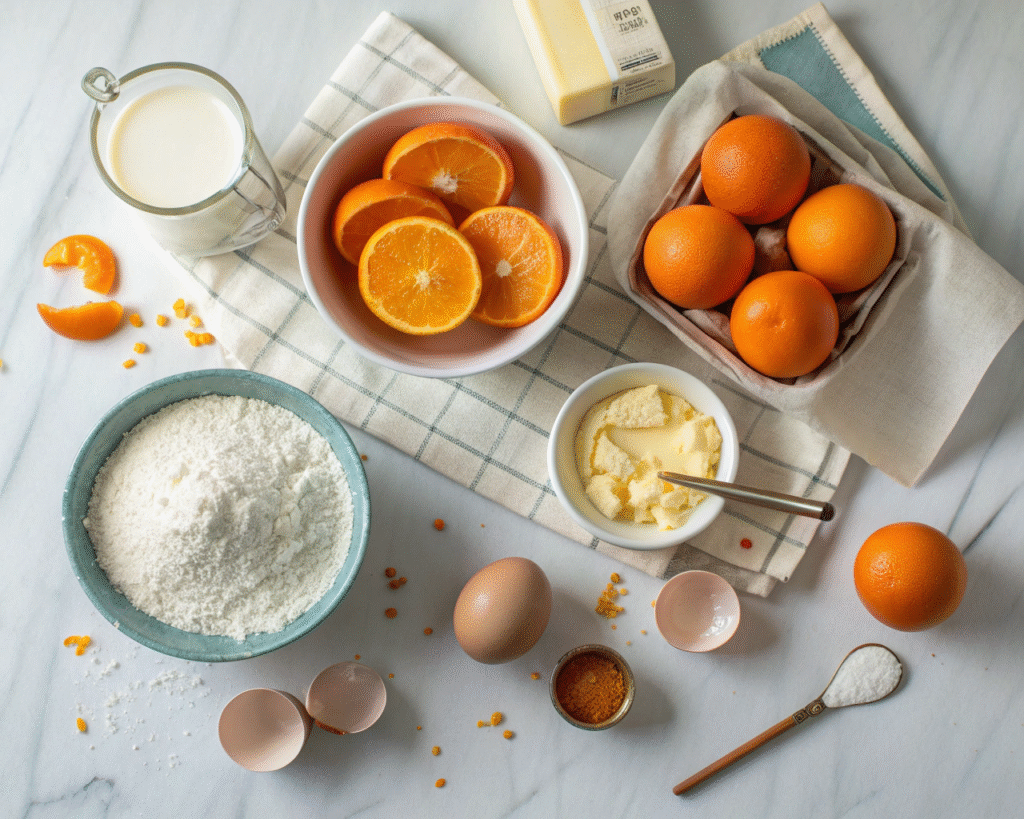
For the Baked Donuts:
- 2 cups all-purpose flour
- ¾ cup granulated sugar
- 2 teaspoons baking powder
- ½ teaspoon salt
- ¼ teaspoon ground nutmeg (optional but adds warmth)
- 2 large eggs, room temperature
- ¾ cup whole milk (or buttermilk for extra tang)
- ¼ cup unsalted butter, melted and slightly cooled
- 2 tablespoons fresh orange juice
- 1 tablespoon orange zest (from about 1 large orange)
- 1 teaspoon vanilla extract
For the Orange Glaze:
- 2 cups powdered sugar (confectioners’ sugar)
- 3-4 tablespoons fresh orange juice
- 1 tablespoon orange zest
- 1 tablespoon melted butter (makes glaze glossy)
- Pinch of salt
Optional Toppings:
- Extra orange zest (candied or fresh)
- Orange sprinkles
- Chopped pistachios
- Shredded coconut
- White chocolate drizzle
Ingredient Notes for Best Results:
Donut pan is essential: You need a standard 6-cavity donut pan (makes 12 donuts in two batches). Can’t substitute with regular muffin tins – you won’t get the ring shape!
Fresh orange is key: Use fresh orange juice and zest, not bottled juice or artificial flavoring. The difference in flavor is huge! One large orange usually gives you enough juice and zest.
Room temperature matters: Room temp eggs and milk create smoother batter and better texture. Take them out 30 minutes before baking or warm slightly.
Don’t skip the butter: The melted butter makes these donuts tender and rich. Vegetable oil works but butter tastes better!
Buttermilk option: Using buttermilk instead of regular milk creates tangier, more tender donuts. If using, add ¼ teaspoon baking soda to the dry ingredients.
Glaze consistency: The glaze should be thick but pourable – like thick honey. Too thin = won’t stick. Too thick = clumpy. Add juice 1 tablespoon at a time to adjust.
Step-by-Step Instructions
Step 1: Preheat and Prep the Pan (3 minutes)
Preheat your oven to 375°F (190°C).
Generously grease your donut pan with butter or cooking spray. Get into all the crevices! These donuts need to pop out easily.
Pro tip: Use a pastry brush to thoroughly coat the pan with melted butter. This ensures donuts release perfectly and adds extra flavor!
Why grease well? Donut pans have lots of curves. Under-greased pans = stuck donuts that break when removing. Be generous!
Step 2: Mix Dry Ingredients (2 minutes)
In a large bowl, whisk together:
- 2 cups flour
- ¾ cup sugar
- 2 tsp baking powder
- ½ tsp salt
- ¼ tsp nutmeg (if using)
Whisk for 30 seconds until everything is evenly distributed and there are no lumps.
Why whisk dry ingredients? It aerates the flour and distributes the leavening evenly for consistent rise.
Step 3: Mix Wet Ingredients (2 minutes)
In a medium bowl or large measuring cup, whisk together:
- 2 eggs
- ¾ cup milk
- ¼ cup melted butter (cooled slightly)
- 2 tbsp orange juice
- 1 tbsp orange zest
- 1 tsp vanilla
Whisk until smooth and combined. The mixture should be pale yellow and slightly frothy.
Zesting tip: Use a microplane or fine grater. Only take the colored part of the peel – the white pith underneath is bitter!
Step 4: Combine Wet and Dry (1 minute)
Pour the wet ingredients into the bowl with dry ingredients.
Using a wooden spoon or spatula, gently fold until just combined. Stop when you no longer see dry flour streaks.
DON’T OVERMIX! A few small lumps are okay. Overmixing creates tough, dense donuts instead of light, fluffy ones.
The batter: Should be thick but pourable – like thick pancake batter. If it’s too thick to pour, add 1-2 tablespoons more milk.
Step 5: Fill the Donut Pan (3 minutes)
Transfer batter to a piping bag or large ziplock bag with one corner cut off. This makes filling the pan SO much easier!
No piping bag? Use a spoon, but it’s messier and less precise. A ziplock with corner snipped works perfectly!
Pipe batter into each cavity, filling about ⅔ full. Don’t overfill or you’ll lose the hole in the middle!
Even distribution: Try to get the same amount in each cavity so they bake evenly. Use a scale if you’re precise!
Work in batches: Most donut pans make 6 at a time. Bake the first batch, then refill and bake the second batch.
Step 6: Bake to Golden Perfection (10-12 minutes)
Bake for 10-12 minutes until donuts are golden on top and spring back when lightly touched.
Test for doneness: Insert a toothpick in the thickest part. It should come out clean or with just a few dry crumbs.
Visual cue: The tops should be lightly golden and the edges will start to pull away from the pan slightly.
Don’t overbake! These donuts dry out if overbaked. It’s better to slightly underbake than overbake.
Baking the second batch: While first batch cools, refill the pan and bake the remaining batter.
Step 7: Cool the Donuts (5 minutes)
Let donuts cool in the pan for 2-3 minutes. This lets them set and makes removal easier.
Run a butter knife around edges if needed, then gently turn pan over onto a cooling rack. The donuts should fall out easily.
If they stick: Let them cool another minute. The heat and steam help them release. Forcing them out breaks them!
Cool completely before glazing (about 10-15 minutes total). Glazing warm donuts makes the glaze too thin and it won’t set properly.
Step 8: Make the Orange Glaze (3 minutes)
In a medium bowl, whisk together:
- 2 cups powdered sugar
- 3 tablespoons orange juice (start with 3, add more if needed)
- 1 tablespoon orange zest
- 1 tablespoon melted butter
- Pinch of salt
Whisk until completely smooth. The glaze should be thick but pourable – like thick honey.
Too thick? Add more orange juice, 1 teaspoon at a time.
Too thin? Add more powdered sugar, 2 tablespoons at a time.
The right consistency: When you lift the whisk, the glaze should slowly drip off in a thick ribbon and take a few seconds to disappear back into the bowl.
Step 9: Glaze the Donuts (5 minutes)
Dip the top of each cooled donut into the glaze, letting the excess drip back into the bowl.
Twirl slightly as you lift out to get that beautiful drip effect down the sides.
Place glazed-side-up on a cooling rack over a baking sheet (to catch drips).
Sprinkle with extra orange zest immediately while glaze is wet (wait too long and toppings won’t stick).
Let glaze set for 10-15 minutes. It will firm up and become slightly shiny but won’t harden completely.
Double-dipping: Want extra glaze? Let the first coat set for 10 minutes, then dip again for a thicker coating!
Pro Tips for Perfect Baked Orange Donuts
Room temperature ingredients: This is the #1 tip for tender donuts. Cold ingredients create dense texture. Warm ingredients mix smoothly and create fluffy donuts.
Don’t overfill the pan: Fill cavities only ⅔ full. Overfilling = no hole in the center and/or overflow mess in your oven.
Use a piping bag: This makes filling the pan so much easier and cleaner. A ziplock bag works perfectly if you don’t have a real piping bag.
Fresh orange makes a difference: Don’t use bottled orange juice! Fresh juice and zest create bright, authentic orange flavor.
Check doneness early: Start checking at 10 minutes. Overbaked donuts = dry donuts. Better slightly underdone than overdone!
Cool completely before glazing: Glazing warm donuts = melted, thin glaze that slides right off. Patient = pretty, set glaze.
Glaze consistency is crucial: Too thin = won’t coat well. Too thick = clumpy and uneven. Add liquid gradually to get it perfect.
Make extra glaze: You’ll have some leftover in the bowl after dipping. It’s easier to work with more glaze than trying to dip in too-shallow glaze.
Delicious Variations
Lemon Glazed Donuts
Replace orange juice and zest with lemon. Add poppy seeds to batter for lemon-poppy donuts!
Chocolate Orange Donuts
Add 2 tablespoons cocoa powder to dry ingredients. Keep orange glaze for chocolate-orange combo (like those chocolate oranges!).
Vanilla Glazed Classic
Skip orange in batter. Make simple vanilla glaze: powdered sugar + milk + vanilla extract. Sprinkle with rainbow sprinkles!
Cinnamon Sugar Donuts
Skip glaze. Brush warm donuts with melted butter and toss in cinnamon-sugar mixture. Classic fairground style!
Maple Glazed
Replace orange glaze with maple glaze: powdered sugar + maple syrup + touch of milk. Top with crumbled bacon for maple-bacon donuts!
Strawberry Glazed
Replace orange juice with strawberry purée. Add pink food coloring if desired. Top with freeze-dried strawberries!
Matcha Glazed
Add 2 teaspoons matcha powder to glaze. Creates beautiful green glaze with earthy flavor.
Boston Cream Style
Skip glaze. Split donuts horizontally, fill with vanilla pastry cream, top with chocolate ganache.
Storage & Serving
Room Temperature:
Store unglazed donuts in airtight container for 2 days at room temperature.
Glazed donuts are best eaten same day but will keep (uncovered, to keep glaze from getting sticky) for 1 day.
Refrigerator:
Don’t refrigerate! It dries them out. Room temperature or freezer are better options.
Freezer:
Unglazed donuts freeze beautifully for up to 3 months:
- Cool completely
- Wrap individually in plastic wrap
- Place all in freezer bag
- Thaw at room temperature, then glaze fresh!
Glazed donuts can be frozen but glaze may crack:
- Freeze on baking sheet until solid
- Transfer to container
- Thaw at room temperature
Best practice: Freeze unglazed donuts and make fresh glaze when ready to serve!
Serving Ideas:
- With morning coffee or tea
- As brunch centerpiece
- Kids’ birthday party treat
- After-school snack with milk
- Dessert with vanilla ice cream
Frequently Asked Questions
Do I have to use a donut pan?
Yes, for the ring shape! You can’t make donut rings without a donut pan. However, you can use a mini bundt pan and make 6 larger “donuts” (adjust baking time to 15-18 minutes).
Can I make these without eggs?
It’s tricky in this recipe since eggs provide structure. You could try: 2 “flax eggs” (2 tbsp ground flaxseed + 6 tbsp water, let sit 5 min) or commercial egg replacer, but texture will be different.
Why are my donuts dense and heavy?
Usually means overmixing after adding wet to dry ingredients. Mix only until flour disappears – lumpy batter is okay! Also check that baking powder is fresh (not expired).
The glaze won’t stick to my donuts. Why?
Glaze too thin (add more powdered sugar) or donuts too warm (cool completely first). Also, glazing same-day is important – day-old donuts don’t absorb glaze as well.
Can I use a different citrus?
Absolutely! Lemon, lime, or grapefruit all work. Lemon is most popular. Grapefruit creates beautiful pink glaze!
My donuts stuck to the pan!
Pan wasn’t greased enough. Use plenty of butter or cooking spray, getting into all crevices. Also, let donuts cool 2-3 minutes before removing – they need time to set.
Are baked donuts healthier than fried?
They’re lighter and contain less fat since they’re not deep-fried. But they still have sugar and calories – they’re a treat! Just a slightly lighter treat.
Can I make the batter ahead?
Not recommended. The baking powder activates when wet meets dry, so batter loses potency if stored. However, you can mix dry ingredients the night before.
How do I prevent the hole from closing?
Don’t overfill the cavities – stop at ⅔ full. Also, some donut pans have a post in the center that’s taller than others – this helps maintain the hole.
Why Everyone Loves These Donuts
No Frying Required: All the donut deliciousness without the mess, smell, or calories of deep frying!
Quick & Easy: Under 30 minutes from start to finish. Faster than going to a donut shop!
Beautiful Presentation: That glossy orange glaze and perfect ring shape make these look professional and impressive.
Bright Citrus Flavor: The fresh orange taste is refreshing, not artificial. Like sunshine in donut form!
Perfect for Sharing: Make a batch for the office, neighbors, or bake sale. Everyone loves homemade donuts!
Kid-Friendly: Kids love making these (mixing, piping, glazing) and eating them! Great family baking project.
Breakfast Treat: These feel indulgent but aren’t as heavy as fried donuts – you can enjoy one for breakfast without guilt!
Customizable: The base recipe is versatile. Change flavors, colors, and toppings to match any occasion or preference.
The Bottom Line
These baked orange glazed donuts prove you don’t need a deep fryer to make incredible donuts at home. With simple ingredients, a donut pan, and about 30 minutes, you can create bakery-quality donuts that are light, fluffy, and bursting with bright orange flavor.
The combination of tender cake donuts with that glossy, sweet-tart orange glaze is absolutely irresistible. The fresh orange juice and zest create authentic citrus flavor that tastes like spring and sunshine – nothing artificial about it. And that beautiful glaze dripping down the sides? Instagram-worthy every single time.
The best part is how easy these are to make. No yeast to activate, no dough to knead and rise, no hot oil to manage. Just mix, pipe, bake, glaze, and enjoy. Even beginner bakers will succeed with this recipe – it’s forgiving, fast, and foolproof.
Make these for weekend breakfast, surprise your family on a weekday morning, bring them to brunch, or package them as gifts. However you serve them, these baked orange glazed donuts will bring smiles and requests for the recipe. Once you master this basic technique, you can experiment with endless flavor combinations!
Happy baking, and remember: homemade donuts are always better than store-bought!
– Chef Hanna
Prep Time: 15 minutes
Cook Time: 12 minutes (per batch)
Total Time: 27 minutes
Yield: 12 donuts
Category: Breakfast, Dessert, Baking
Method: Baking
Cuisine: American
Diet: Vegetarian
Keywords: baked orange donuts, glazed donuts recipe, homemade donuts, citrus donuts, easy baked donuts, orange glaze, donut pan recipe, breakfast treats, no-fry donuts