

Mornings can be hectic, and the last thing anyone wants is to spend precious time cooking breakfast from scratch. Enter meal prep breakfast sandwiches—the ultimate time-saving, grab-and-go breakfast solution! These sandwiches are not only convenient but also customizable, budget-friendly, and healthier than store-bought alternatives.
In this guide, we’ll walk you through everything you need to know about making, storing, and reheating the best meal prep breakfast sandwiches. Whether you’re looking for high-protein, low-carb, or vegetarian options, we’ve got you covered. Plus, we’ll share pro tips to keep your sandwiches fresh and delicious all week long.
Let’s dive in!
Table of Contents
Why Meal Prep Breakfast Sandwiches Are a Game-Changer
Breakfast is the most important meal of the day, yet so many of us skip it because we’re short on time. That’s where meal prep breakfast sandwiches come in! Prepping your sandwiches in advance can transform your mornings, making them smoother, healthier, and stress-free.
The Benefits of Meal Prepping Breakfast
Why should you spend a little extra time prepping breakfast sandwiches ahead of time? Here are the top reasons:
- Saves Time – No more scrambling in the morning. Just grab, reheat, and enjoy!
- Healthier Than Fast Food – Control your ingredients and avoid preservatives.
- Budget-Friendly – Making your own is way cheaper than buying from coffee shops.
- Perfect for Busy Lifestyles – Ideal for students, professionals, and parents on the go.
Time-Saving and Convenience
Mornings can be chaotic—whether you’re rushing to work, getting kids ready, or just trying to start your day efficiently. With meal prep breakfast sandwiches, you eliminate the need to cook, clean, or even think about what to eat. Simply reheat and go!
Healthier Than Store-Bought Options
Pre-packaged breakfast sandwiches often contain excessive sodium, preservatives, and unhealthy fats. By making your own, you can choose wholesome, nutrient-dense ingredients—whole grain breads, lean proteins, and fresh veggies. Plus, you can customize them to fit your dietary needs, whether that’s low-carb, keto, vegetarian, or high-protein.
Budget-Friendly Alternative
A single breakfast sandwich from a coffee shop can set you back $5 or more. If you buy one daily, that’s at least $150 a month! Meanwhile, homemade meal prep breakfast sandwiches cost a fraction of that—typically under $2 per sandwich. That’s a huge savings over time!
Essential Ingredients for the Best Meal Prep Breakfast Sandwiches
When it comes to making meal prep breakfast sandwiches, choosing the right ingredients makes all the difference. From the bread to the fillings, every component plays a role in taste, texture, and freshness. Let’s break down the best options so you can craft the perfect make-ahead breakfast sandwich every time.
Choosing the Right Bread: English Muffins, Bagels, or Croissants?
Not all bread is created equal, especially when it comes to meal prepping. You need something that holds up well in the fridge or freezer.
- English Muffins – A classic choice! They toast well, hold their shape, and stay firm after reheating.
- Bagels – Ideal for a heartier sandwich, but they can get chewy if not properly toasted before freezing.
- Croissants – Buttery and flaky, these taste amazing but tend to get soggy when stored for too long.
- Whole Grain or Gluten-Free Options – If you’re looking for a healthier alternative, whole wheat or gluten-free sandwich thins are great choices.
Protein Choices: Eggs, Bacon, Sausage, Turkey, or Plant-Based Alternatives
Your protein selection adds flavor and keeps you full longer. Here are some top picks:
- Eggs – Scrambled, baked, or fried, eggs are the foundation of most breakfast sandwiches.
- Bacon – Adds a crispy, smoky bite. Turkey bacon is a leaner alternative.
- Sausage Patties – A great option for a hearty sandwich. Choose chicken or turkey sausage for a lighter meal.
- Deli Turkey or Ham – Perfect for a leaner, high-protein breakfast sandwich.
- Plant-Based Options – Try tempeh bacon, tofu scrambles, or vegan sausage patties for a meatless breakfast.
Cheese Options: Cheddar, Swiss, Pepper Jack, or Dairy-Free Substitutes
Adding cheese enhances both flavor and texture. Some great choices include:
- Cheddar – A sharp, classic option that melts beautifully.
- Swiss – A mild and creamy option that pairs well with turkey or ham.
- Pepper Jack – If you like a little spice, this is a great choice.
- Dairy-Free – If you’re lactose intolerant, opt for vegan cheeses made from cashews or almonds.
Adding Vegetables for Extra Nutrition
Boost your sandwich’s nutritional value with some fresh veggies:
- Spinach or Kale – Adds fiber and vitamins without changing the texture much.
- Tomatoes – A juicy addition but can make the sandwich soggy—best added fresh after reheating.
- Avocado – Offers a creamy texture and healthy fats.
- Bell Peppers or Onions – Adds a bit of crunch and extra flavor.
Condiments and Spices to Elevate Flavor
A little seasoning goes a long way! Try these for an extra kick:
- Salt and Black Pepper – Simple but essential.
- Hot Sauce or Sriracha – If you love spice, add a dash!
- Garlic or Onion Powder – Enhances flavor without extra calories.
- Pesto or Hummus – Adds a unique twist to traditional breakfast sandwiches.
- Now that we’ve covered the best ingredients, let’s move on to how to prepare and assemble your sandwiches like a pro in Part 3.
Step-by-Step Guide to Making Meal Prep Breakfast Sandwiches

Making meal prep breakfast sandwiches isn’t just about throwing ingredients together. Proper technique ensures better texture, fresher taste, and longer shelf life. Follow this step-by-step guide to create the perfect make-ahead breakfast sandwiches.
Preparing and Cooking Eggs for Meal Prep
Eggs are the heart of most breakfast sandwiches, and there are multiple ways to prepare them:
- Baked Egg Squares – The best option for meal prep! Pour whisked eggs into a baking dish, bake, and cut into squares for easy sandwich assembly.
- Scrambled Eggs – Soft and fluffy but can become watery when reheated. If using scrambled eggs, cook them on low heat for a firmer texture.
- Fried or Poached Eggs – These work well if you plan to eat the sandwiches fresh but don’t reheat as well from frozen.
Best Cooking Methods for Turkey Bacon, Sausage, and Other Proteins
- Turkey Bacon – Bake at 400°F (200°C) for 15-20 minutes on a sheet pan for crispy, mess-free bacon.
- Sausage Patties – Pan-fry or bake until golden brown and fully cooked.
- Turkey or Ham Slices – No need to cook, but lightly searing them can enhance the flavor.
- Vegan Options – Cook plant-based patties the same way as regular sausage.
Assembling the Perfect Breakfast Sandwich
Now comes the fun part—putting everything together! Here’s how to assemble your meal prep breakfast sandwiches for maximum freshness:
- Toast the Bread – Lightly toast your English muffins or bagels to prevent sogginess.
- Layer the Ingredients in the Right Order – Start with cheese, then egg, then meat. This keeps the sandwich structurally sound and prevents soggy bread.
- Add Condiments Wisely – Avoid adding wet ingredients like tomato or avocado until you’re ready to eat. Instead, store them separately.
- Let Everything Cool Completely – Before wrapping and storing, let the sandwiches cool down to prevent excess moisture buildup.
Toasting vs. Non-Toasting: Which is Better?
If you’re freezing your sandwiches, lightly toasting the bread beforehand is best—it prevents it from getting too soft after reheating. If you’re eating the sandwiches within a couple of days, you can skip the toasting step.
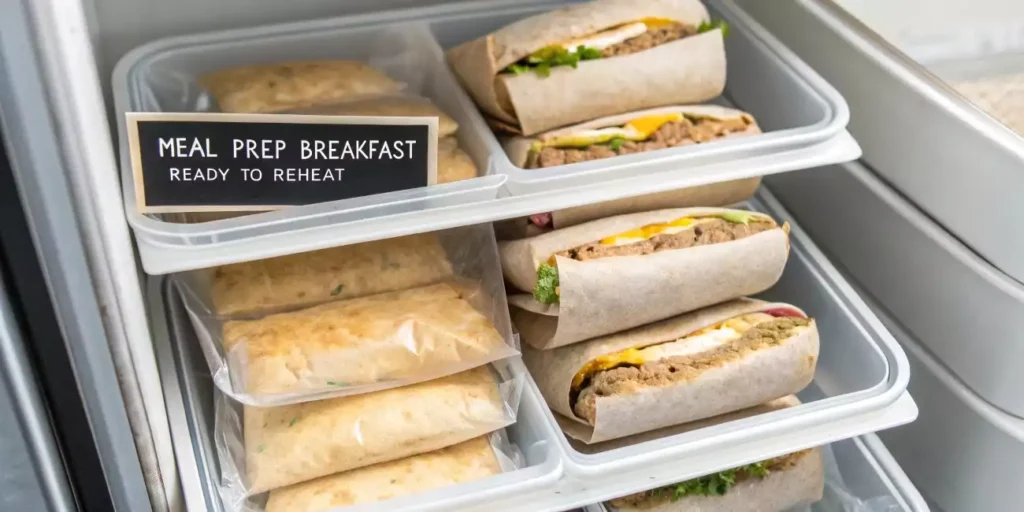
How to Properly Store and Freeze Breakfast Sandwiches
Once you’ve assembled your meal prep breakfast sandwiches, it’s crucial to store them correctly to keep them fresh, flavorful, and safe to eat. Whether you’re storing them in the fridge or freezer, proper wrapping and reheating techniques will prevent sogginess and maintain texture.
How to Wrap Breakfast Sandwiches for Maximum Freshness
To keep your sandwiches tasting as fresh as possible, wrapping them properly is key. Follow these steps:
- Let them cool completely – Storing warm sandwiches creates condensation, which leads to soggy bread.
- Wrap individually – Use parchment paper, aluminum foil, or plastic wrap to seal in freshness.
- Double-layer for freezing – If freezing, wrap each sandwich in foil first, then place them in a resealable freezer bag. This prevents freezer burn.
- Label and date – Write the date on the bag so you know how long they’ve been stored.
The Best Containers for Storing Breakfast Sandwiches
While wrapping individually is great, storing sandwiches in an airtight container adds extra protection against freezer burn. Here are the best options:
- Glass Meal Prep Containers – Great for fridge storage and reheating.
- Plastic or Silicone Freezer Bags – Ideal for stacking sandwiches in the freezer.
- Reusable Silicone Wraps – An eco-friendly option that keeps sandwiches fresh.
Refrigeration vs. Freezing: How Long Do They Last?
- Refrigerator: Meal prep breakfast sandwiches last 3-4 days when stored in an airtight container.
- Freezer: Properly wrapped, they stay fresh for up to 2 months without losing flavor.
Preventing Sogginess When Reheating
No one likes a soggy sandwich! To keep your meal prep breakfast sandwiches crispy and delicious, follow these tips:
- Use a paper towel – If reheating in the microwave, wrap the sandwich in a paper towel to absorb excess moisture.
- Avoid overcooking – Overheating eggs can make them rubbery, so heat in short 30-second intervals.
- Use a toaster oven – For crispier bread, reheat in a toaster oven instead of a microwave.
With the right storage and reheating methods, your breakfast sandwiches will taste just as good as freshly made! Now, let’s move on to how to reheat them properly in Part 5.
How to Reheat Meal Prep Breakfast Sandwiches for the Best Taste
Reheating meal prep breakfast sandwiches the right way can make all the difference in taste and texture. While the microwave is the fastest option, other methods give you crispy, freshly made results.
Reheating in the Microwave: Quick and Easy
Microwaving is the fastest and easiest way to heat up your sandwich, but there’s a right way to do it:
- Remove the sandwich from foil or plastic wrap.
- Wrap it in a damp paper towel to keep it from drying out.
- Heat on 50% power for 1-2 minutes, flipping halfway through.
- If needed, add another 15-30 seconds until fully warmed.
Tip: If reheating from frozen, microwave for 30 seconds first, then let it sit for a minute before heating fully.
Using the Oven or Toaster Oven for Better Texture
For a crispier sandwich, the oven is the best method:
- Preheat oven to 350°F (175°C).
- Place sandwiches on a baking sheet and cover loosely with foil to prevent drying out.
- Bake for 10-15 minutes (or 20 minutes if frozen).
Tip: If you like extra crispy bread, remove the foil for the last 2-3 minutes of baking.
Stovetop Reheating for Crispy Results
If you don’t have an oven, you can use a stovetop skillet:
- Heat a non-stick pan over medium heat.
- Add a little butter or oil for extra crispiness.
- Cook the sandwich for 2-3 minutes on each side until golden brown and heated through.
Tip: Cover the pan with a lid for the last minute to help melt the cheese.
Best Tips to Keep Them from Drying Out
- Add a splash of water – If using an oven, place a small dish of water in the oven to keep sandwiches moist.
- Don’t overheat – The key to a great reheated sandwich is gentle heating.
- Use fresh toppings – Add ingredients like avocado, lettuce, or fresh tomatoes after reheating to keep flavors vibrant.
With these methods, your meal prep breakfast sandwiches will taste just as good as the day you made them!
Healthy Variations of Meal Prep Breakfast Sandwiches
Not all meal prep breakfast sandwiches have to be high in carbs or loaded with processed ingredients. With a few smart swaps, you can create nutritious and delicious versions to fit your dietary needs. Whether you’re following a low-carb, high-protein, vegetarian, or gluten-free diet, there’s an option for you!
Low-Carb and Keto-Friendly Breakfast Sandwiches
For those following a low-carb or keto diet, traditional bread isn’t ideal. Instead, try these creative bread substitutes:
- Egg “Buns” – Use baked or fried eggs as a bun replacement.
- Portobello Mushroom Caps – A hearty, low-carb alternative with great flavor.
- Lettuce Wraps – Crisp, fresh, and great for a lighter breakfast.
- Almond Flour or Coconut Flour Biscuits – A homemade, keto-friendly alternative.
For the filling, stick to high-fat, low-carb ingredients like bacon, sausage, avocado, and cheese. Avoid sugary sauces and opt for low-carb condiments like hot sauce or aioli.
High-Protein Options for Fitness Enthusiasts
If you’re looking to fuel your body with a high-protein breakfast, try these protein-packed sandwich ideas:
- Extra Egg Whites – Adding egg whites increases protein without extra fat.
- Lean Turkey or Chicken Sausage – A healthier alternative to pork sausage.
- Cottage Cheese Spread – A high-protein, creamy addition that blends well with eggs.
- Sprouted Grain Bread – Contains more protein and fiber than white bread.
Pairing these ingredients together ensures your meal prep breakfast sandwiches will keep you full and energized for hours!
Vegetarian and Vegan Breakfast Sandwich Ideas
Going meat-free? No problem! There are plenty of delicious plant-based ways to build a satisfying breakfast sandwich:
- Tofu Scramble – A great egg substitute packed with protein.
- Vegan Sausage Patties – Brands like Beyond Meat or homemade options work well.
- Avocado and Hummus Spread – Adds creaminess and healthy fats.
- Dairy-Free Cheese – Made from cashews, almonds, or coconut.
For a vegan-friendly bun, use whole wheat English muffins, sourdough bread, or gluten-free wraps.
Gluten-Free Choices for Those with Dietary Restrictions
If you need to avoid gluten, don’t worry! There are many gluten-free options for breakfast sandwiches:
- Gluten-Free English Muffins – Brands like Udi’s offer tasty, soft options.
- Rice Cakes or Corn Tortillas – Light but still sturdy enough to hold fillings.
- Sweet Potato Slices – Roasted sweet potatoes make a nutrient-packed bread swap.
These simple ingredient changes ensure that everyone can enjoy delicious and convenient meal prep breakfast sandwiches!
Creative Meal Prep Breakfast Sandwich Recipes
Now that we’ve covered storage, reheating, and healthy swaps, it’s time to get creative with recipes! These four meal prep breakfast sandwiches bring bold flavors and nutritious ingredients to your morning routine.
Classic Egg, Cheese, and Bacon Sandwich
This timeless favorite is simple to make and perfect for meal prep.
Ingredients:
- 1 whole wheat English muffin
- 1 egg, cooked to preference
- 1 slice of cheddar cheese
- 2 slices of turkey or regular bacon
- 1 tsp butter or avocado spread (optional)
Instructions:
- Toast the English muffin.
- Cook the egg as desired (scrambled, fried, or baked).
- Cook the bacon until crispy.
- Assemble the sandwich: place cheese, egg, and bacon on the muffin.
- Wrap individually for storage, then refrigerate or freeze.
- Reheat Tip: Microwave for 1 minute or toast in a pan for crispiness.
Spicy Southwest Breakfast Sandwich with Avocado
This recipe brings bold flavors with a creamy avocado twist!
Ingredients:
- 1 whole grain bagel
- 1 egg, scrambled with taco seasoning
- 1 slice pepper jack cheese
- 2 tbsp mashed avocado
- 1 slice turkey sausage
- 1 tsp hot sauce (optional)
Instructions:
- Toast the bagel and mash the avocado onto one side.
- Scramble the egg with taco seasoning.
- Cook the turkey sausage until golden brown.
- Assemble the sandwich, layering cheese, egg, sausage, and avocado.
- Store and wrap properly before refrigerating or freezing.
- Reheat Tip: Add fresh avocado after reheating to maintain creaminess.
Mediterranean-Inspired Sandwich with Feta and Spinach
For a lighter, veggie-packed breakfast, this Mediterranean sandwich is a must-try!
Ingredients:
- 1 whole wheat pita or wrap
- 1 egg, scrambled with spinach
- 2 tbsp crumbled feta cheese
- 2 slices tomato
- 1 tbsp hummus spread
Instructions:
- Lightly toast the pita or wrap.
- Scramble the egg with spinach.
- Spread hummus onto the bread.
- Add eggs, feta, and tomato slices.
- Wrap and store for later.
- Reheat Tip: Use a toaster oven to keep the pita crispy!
High-Protein Cottage Cheese and Egg Muffin Sandwich
For an extra protein boost, this unique sandwich delivers!
Ingredients:
- 1 sprouted grain English muffin
- 1 egg, scrambled
- 2 tbsp cottage cheese
- 2 slices smoked turkey
- 1 tsp Dijon mustard (optional)
Instructions:
- Toast the English muffin.
- Scramble the egg and mix with cottage cheese.
- Spread mustard on the muffin, then layer turkey and egg mixture.
- Store properly before refrigerating or freezing.
- Reheat Tip: Microwave for 30 seconds, then toast for added crunch.
Common Mistakes to Avoid When Meal Prepping Breakfast Sandwiches
Even the best meal prep breakfast sandwiches can go wrong if you don’t follow the right techniques. From soggy bread to overcooked eggs, small mistakes can ruin the texture and taste. To ensure your sandwiches stay fresh, delicious, and easy to reheat, avoid these common pitfalls.
Using the Wrong Bread That Gets Soggy
Not all bread works well for meal prep breakfast sandwiches. Some types absorb too much moisture and become mushy after freezing and reheating.
❌ Avoid:
- White sandwich bread (too soft, gets soggy fast).
- Croissants (flaky but turn limp when reheated).
✅ Use Instead:
- English muffins – Sturdy and toast well.
- Whole wheat bagels – Chewy and hold fillings securely.
- Sprouted grain bread – Higher in fiber, less likely to get soggy.
- Pro Tip: Toast your bread lightly before assembling your sandwich. This creates a barrier against moisture and keeps the sandwich from getting too soft.
Overcooking or Undercooking Eggs
Eggs are the main ingredient in meal prep breakfast sandwiches, so getting them right is key.
❌ Mistakes to Avoid:
- Overcooked eggs become rubbery when reheated.
- Undercooked eggs release excess moisture, making sandwiches soggy.
✅ Best Methods:
- Baked egg patties – Bake eggs in a muffin tin or sheet pan for consistent texture.
- Lightly scrambled eggs – Keep them slightly soft, as they will finish cooking during reheating.
- Pro Tip: Add a splash of milk or cheese to scrambled eggs to keep them moist and fluffy.
Not Wrapping or Storing Properly
If you don’t store your sandwiches the right way, they can dry out or absorb unwanted freezer flavors.
❌ What NOT to do:
- Storing sandwiches loosely in the fridge (they dry out quickly).
- Freezing without wrapping properly, leading to freezer burn.
✅ Best Storage Practices:
- Wrap sandwiches individually in foil, parchment paper, or plastic wrap.
- Place wrapped sandwiches in a sealed freezer bag or airtight container.
- Label and date them so you know how long they’ve been stored.
- Pro Tip: If freezing, double-wrap your sandwiches (foil + freezer bag) to lock in freshness.
Reheating Mistakes That Ruin the Texture
Reheating meal prep breakfast sandwiches the wrong way can make them too dry, too chewy, or just plain unappetizing.
❌ Common Mistakes:
- Microwaving too long, making eggs rubbery.
- Reheating straight from frozen (uneven heating).
- Using only the microwave without crisping the bread.
✅ Best Reheating Methods:
- Microwave: Wrap in a damp paper towel and heat in 30-second intervals.
- Oven or toaster oven: Bake at 350°F (175°C) for 10-15 minutes for crispy results.
- Skillet method: Heat in a pan with a lid on low heat for even reheating.
By avoiding these common mistakes, you’ll have meal prep breakfast sandwiches that taste fresh and flavorful every time! Now, let’s dive into some frequently asked questions in Part 9.
Frequently Asked Questions (FAQs)
Meal prepping breakfast sandwiches is easy once you get the hang of it, but you might still have some questions. Below are answers to common questions people ask about making, storing, and reheating meal prep breakfast sandwiches.
How to Wrap Breakfast Sandwiches for Meal Prep?
To keep your sandwiches fresh and freezer-safe, follow these simple steps:
- Let them cool – Never wrap hot sandwiches, as steam creates moisture.
- Wrap individually – Use parchment paper, aluminum foil, or plastic wrap.
- Store in a sealed bag – Place wrapped sandwiches in an airtight freezer bag.
- Label and date – Write the date on the bag to track freshness.
Pro Tip: If you’re eating within 3 days, store them in an airtight container in the fridge instead of freezing.
Is It Possible to Meal Prep Breakfast?
Absolutely! Meal prepping breakfast saves time, reduces stress, and helps you eat healthier. Along with meal prep breakfast sandwiches, you can also try:
- Overnight oats – A no-cook, high-fiber option.
- Egg muffins – Mini frittatas that are easy to grab and go.
- Protein smoothies – Pre-made and stored in the fridge for quick blending.
- Pro Tip: Meal prep multiple breakfast options at once to keep things interesting throughout the week!
How Long Can a Breakfast Sandwich Last in the Fridge?
Refrigerated meal prep breakfast sandwiches last 3-4 days if stored properly in an airtight container.
- Storage Tip: If you don’t plan to eat them within that time, freeze them instead. Frozen sandwiches last much longer and taste just as good when reheated properly.
How Long Do Meal Prep Breakfast Sandwiches Last in the Freezer?
When wrapped and stored properly, meal prep breakfast sandwiches stay fresh in the freezer for up to 2 months.
- Pro Tip: Avoid keeping them in the freezer longer than that, as the quality may decline over time.